In order to use our migration service, you must have a valid support subscription for MAE or PE.
“Hosted by us” clients are not concerned by this service since they don’t have access to our servers and we manage the server aspects.
What’s the Migration Service?
This service is intended for our MAE and PE clients who have their Siberian hosted on their own server.
- It helps you to make backups of your Siberian on a secure environment of a dedicated server of our company.
- It helps you to also migrate your Siberian either on a new server or on the same server that you would have reinstalled.
To sum it up, it’s a complete backup and migration system for your Siberian.
First, log in with your siberiancms.com account here https://services.siberiancms.com/#/auth
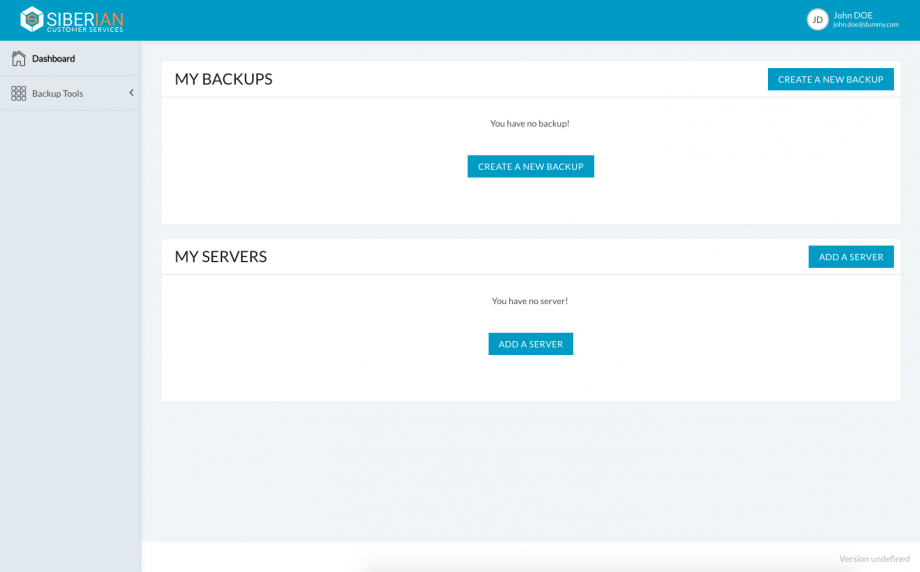
If your support subscription is valid, you should see the following screen after login:
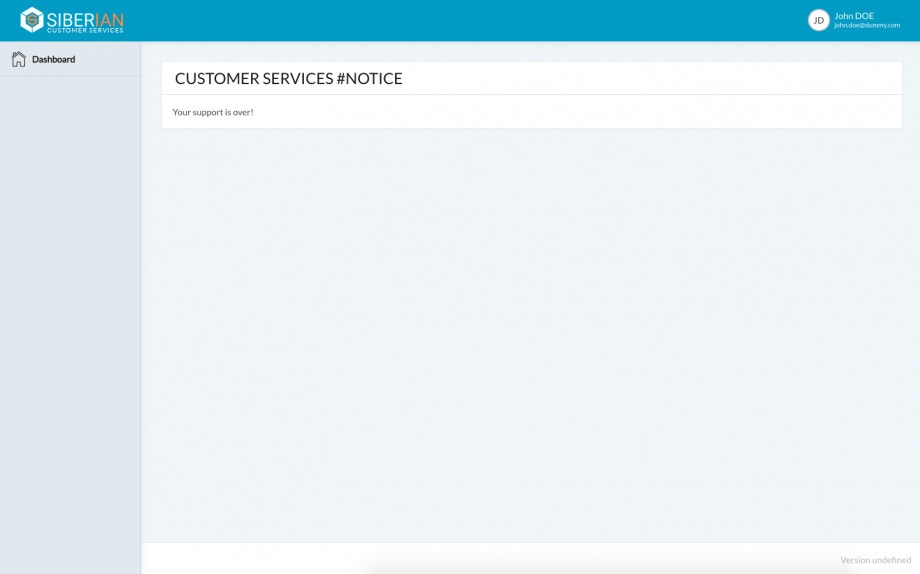
Otherwise you’ll see this one.
Important note: Our backup service will only backup your Siberian installation and Database, if you have anything else installed on your server, it’s up to you to backup them.
After your login, you can now create your first migration by clicking on “Create a new Backup” you will then see the following form:
- Origin Server, this is from where you want to backup your Siberian installation
- Target Server, this is where you want to restore your backup when done
- If you have a new server to restore on, fill it!
- Otherwise, in the case you want to use the same server as the Origin one, and need to reinstall or setup it, you can “Skip target server creation” for now.
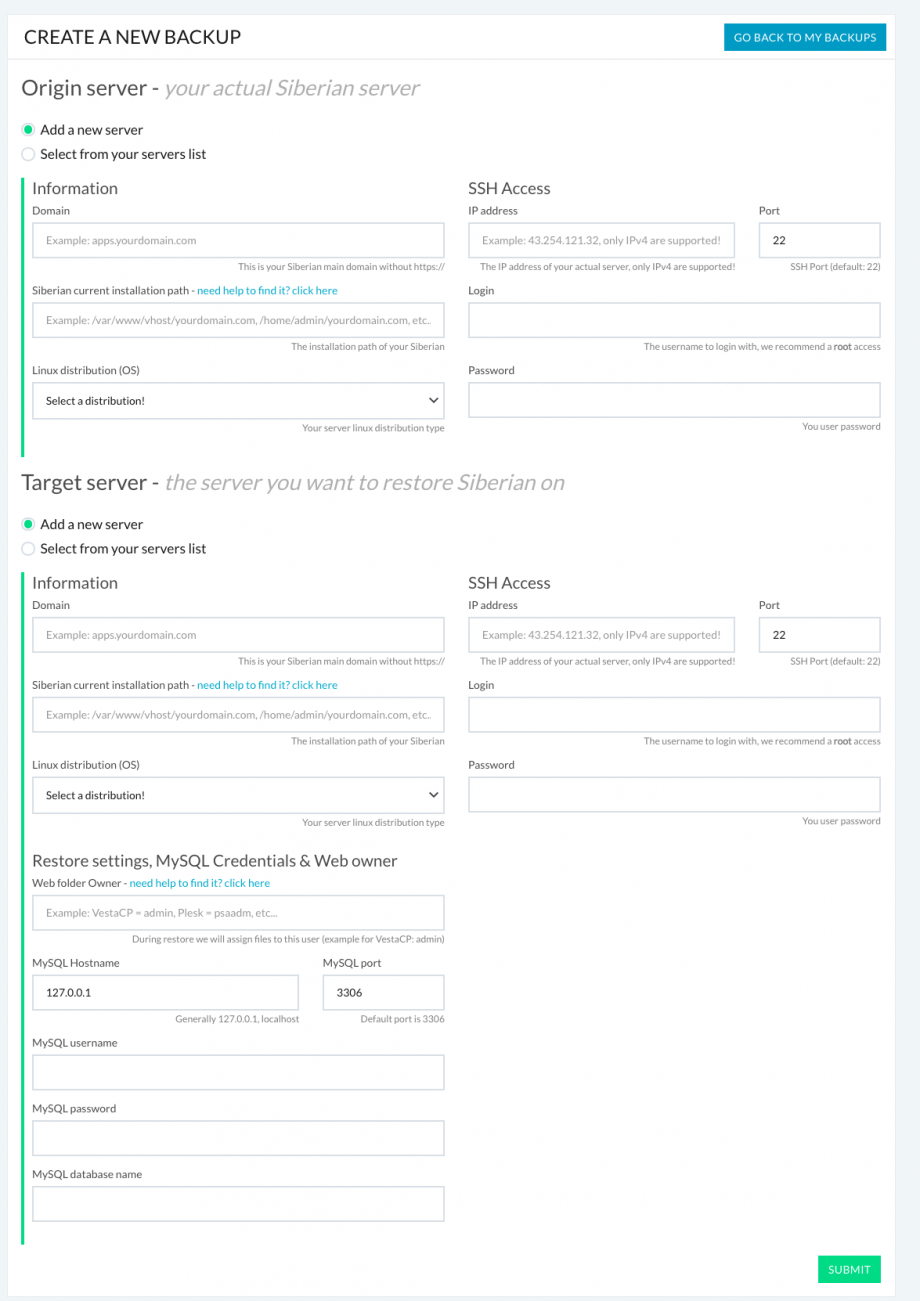
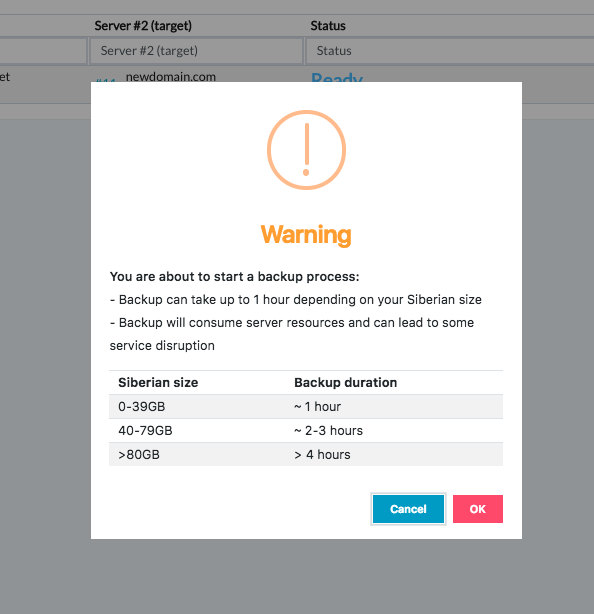
When you have filled all the required data, you can safely submit: no backup or restore will start without actions from you!
Now you should see your Migration like below:
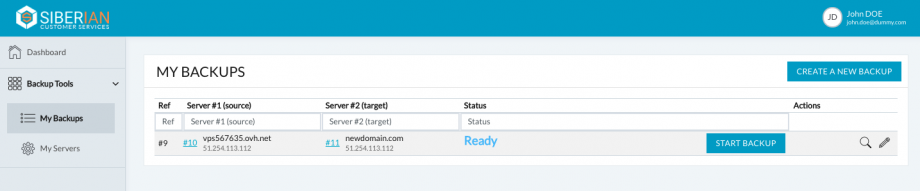
The backup & restore are two different steps, when you are ready to backup, proceed with “Start Backup”
The backup will then proceed with different statuses:
Ready > Backup queued > Backup in progress > Backup Success or Backup Failed
On success or failure, you will be alerted via e-mail.
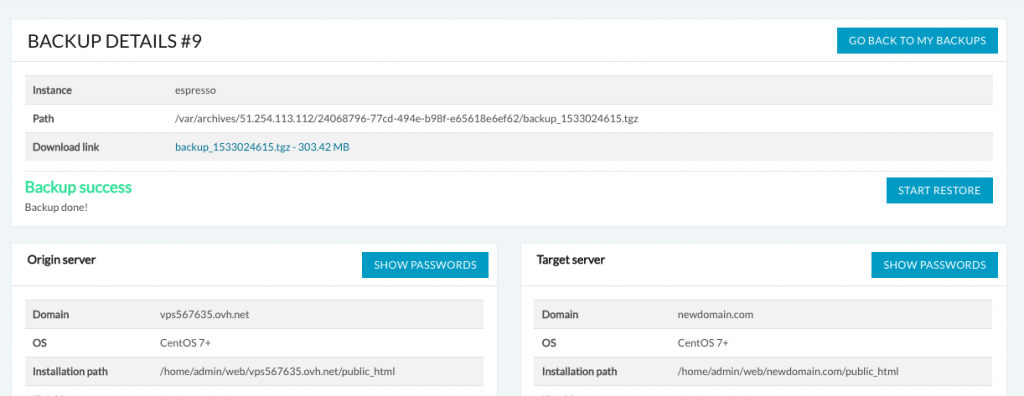
If your backup succeed you will be able to download a copy of it using the download link:
And if for any reason your backup failed, you will get the reason (invalid password, not enough disk space, bad path, etc…)
After that you will be able to “Restart your Backup” and the same process will be repeated.
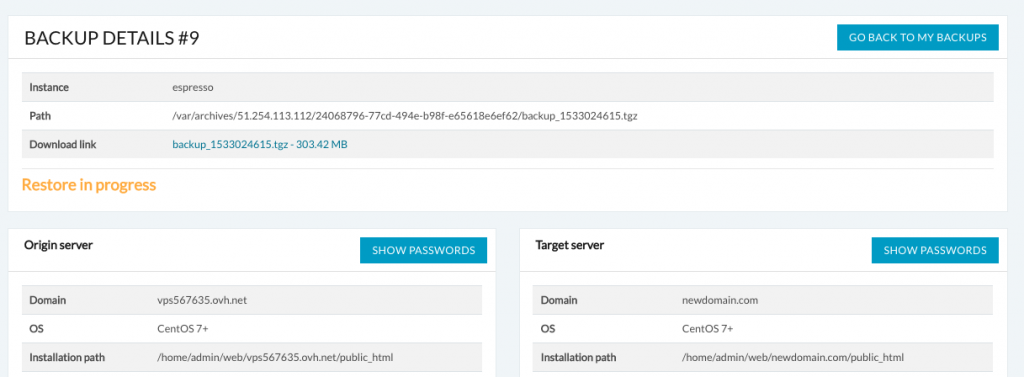
When your backup is done, and already have a target server, you will see a “Start Restore” action, if your “Target Server” is ready you can proceed. Otherwise, you must Setup your target server before starting the restore process.
If your target server is ready then you can proceed to restore, click on “Start Restore”

Then review what will be done & confirm
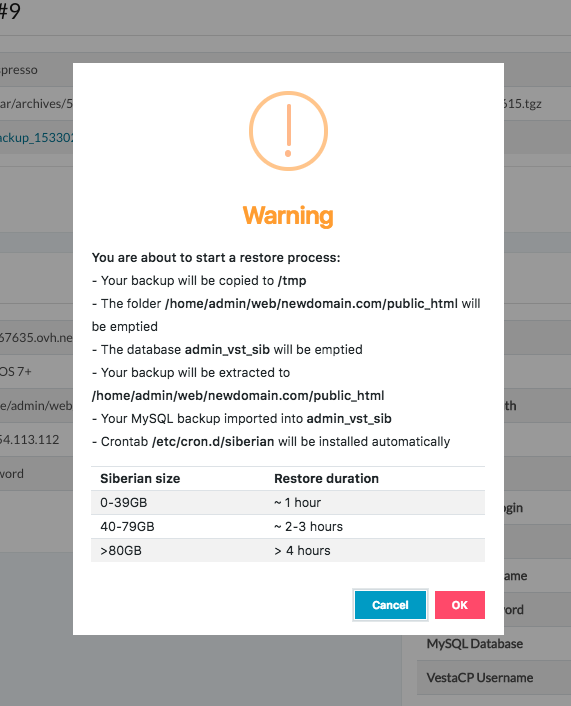
The restore will then be queued and start
Restore queued > Restore in progress > Restore Success or Restore Failed
On success or failure, you will be alerted via e-mail.
And if for any reason your backup failed, you will get the reason (invalid password, not enough disk space, bad path, etc…)
If your restore is successful then you can now open your restored installation and ensure everything works. If it’s ok you can mark your restore as “Done” which means you confirm that your migration process is successful.
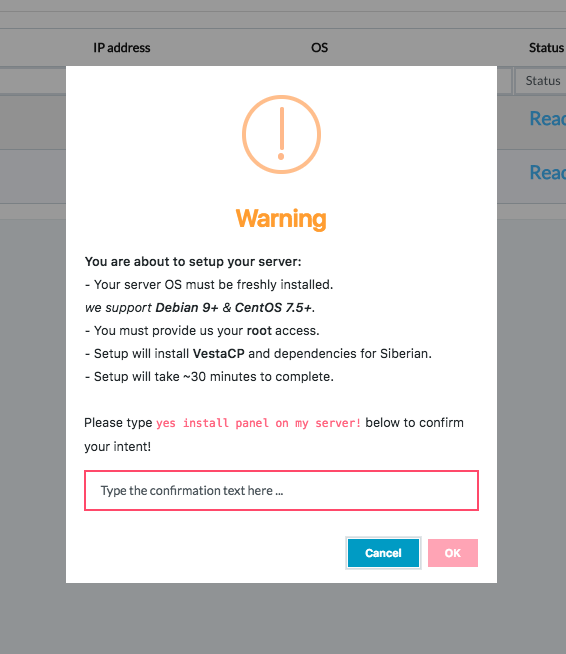
During the backup & restore process, if you want to use the same server but are required to upgrade it to meet the Siberian server requirements, you will need to reinstall it with a recent OS like CentOS 7+ or Debian 8+.
Important Note: before starting a server setup, it’s important that your first install/re-install a fresh OS on it (from your hosting provider admin panel) and root access is required
If you need to do so, the “Setup Server” will setup a complete Admin Panel with all the requirements for your Siberian to be restored on.
- The service will install VestaCP Admin Panel, which is free, we also install java (for the APK generator) and all the required binaries, and configure php settings.
Open “My Servers” and you will see the servers we previously created during the migration process.
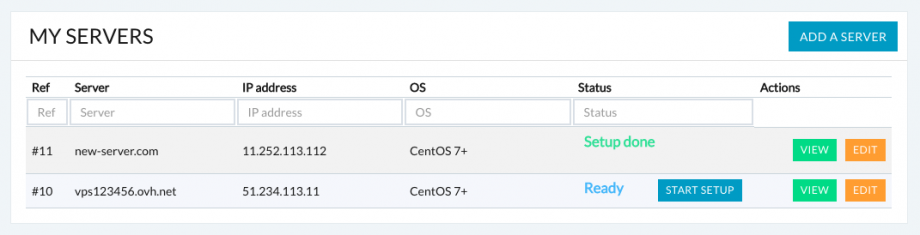
Identify your “Target Server” then click on “Start Setup” review what will be done, and proceed
Like backup & restore processes the Setup process will follow steps:
Ready > Setup queued > Setup in progress > Setup Success or Setup Failed

On success or failure, you will be alerted via e-mail.
And if for any reason your setup failed, you will get the reason (invalid password, not enough disk space, bad path, etc…)
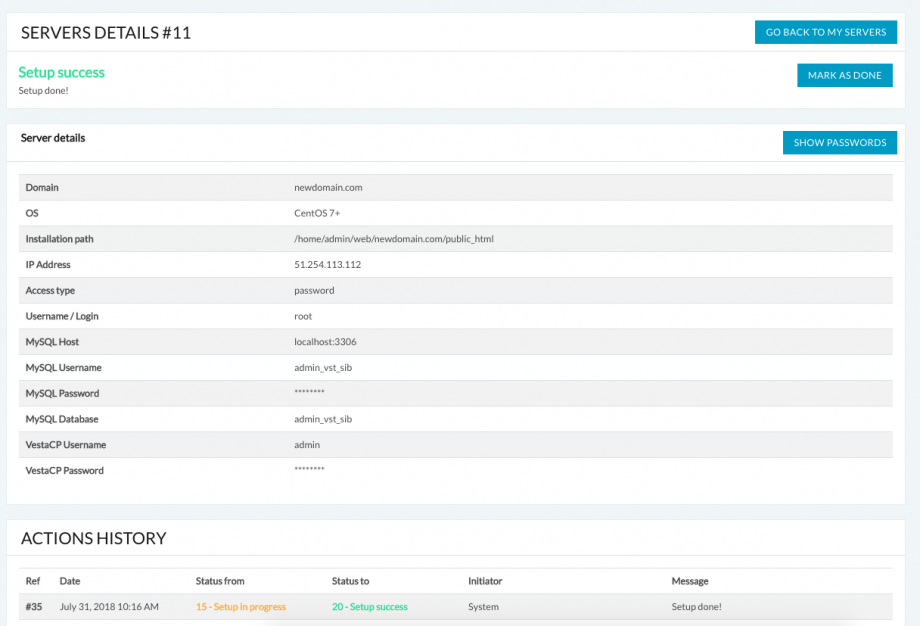
When your server setup is done, your server will be updated with the correct path, login & passwords to proceed to the “Restore” of your Siberian. You will also have access to your Panel credentials under “VestaCP Username/Password” .
Notes:
- To login on your Admin Panel (VestaCP) open the url https://yourdomain.com:8083
- Your SSH root login/password remains unchanged!
Now your server setup is done, you can go back to your backups and proceed to the “Restore” step.
If you previously “Skipped” the target server creation, you can edit your “Backup” and select your server in the list like below. Save and now you can proceed to the “Restore”

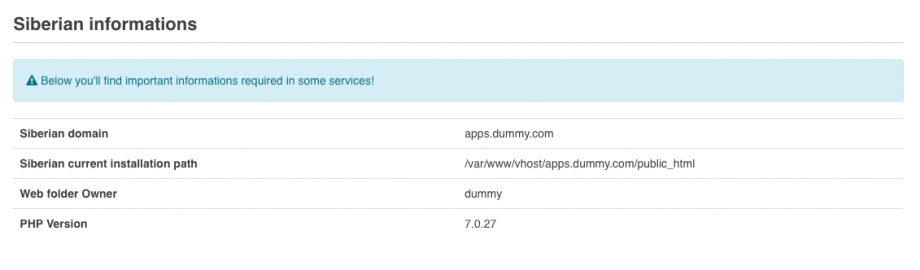
In Siberian update 4.14.8 we added a section helper with important informations for the backup & restore service.
You can access them in your Backoffice
Backoffice > Settings > Advanced > Tools
under the last section Siberian informations