SiberianCMS Admin’s Guide

1.Installing SiberianCMS
SiberianCMS is easy to install. Under most circumstances, installing SiberianCMS is a very simple process and takes less than 10 minutes to complete.
Using this guide, you will find all the steps to install and configure your SiberianCMS Edition.
If you still have some questions after reading this, please fill free to send them to contact@siberiancms.com, our team is ready to answer them.
1.a.Before you begin
Before you begin the install, there are a few things you need to have and do.
These are:
- A domain name and and an access to your domain name admin panel
- Access to your web server (via your Panel or Shell)
- Ability to create MySQL databases
- Your web browser of choice
Begin your installation by:
- Checking to ensure that you and your web host have the minimum requirements to run Siberiancms.
- Creating a A Record for your domain name to point to the IP address of your server
- Downloading the installation file of SiberianCMS.
- Unzipping the downloaded file to a folder on your hard drive.
- Keeping this webpage open so you have it handy during the installation.
1.b.Panel configuration
If you do not have knowledge in server management, it is best to install a panel on your server.
Here is a short comparison of the most used panels for hosting SiberianCMS:
Criterias are: ease of use, compatibility with SiberianCMS and if the panel is free of charge or not.
| Panel | ease of use | Compatibiliy | Free |
|---|---|---|---|
| Plesk | ★★★★★ | ★★★★★ | ✕ |
| Vesta CP | ★★★★☆ | ★★★★★ | ✓ |
| WHM/Cpanel | ★★☆☆☆ | ★★★☆☆ | ✕ |
There are many other panels which are compatible with SiberianCMS. However, the 3 listed here are the one we are used to work on, so the support service will be more able to help with those ones. Please remember also that the support service includes issues on your Siberian, but not on your panel.
You may read some articles before choosing your panel: “web hosting panel comparison”.
If you have any questions about this, please feel free to send an email to contact@siberiancms.com.
1.b.a.How to install Siberian with Plesk
First of all, Siberian CMS is a self-hosted platform. That means you must have a web hosting, and it has to meet the requirements to install Siberian CMS correctly.
The installation, step by step
Installation of Siberian CMS on a Plesk Onyx 17
‣ Unzip the installation zip file. There is just one small index.php file, it is normal, all the files needed to install Siberian will be downloaded from our servers to your server thanks to this file.
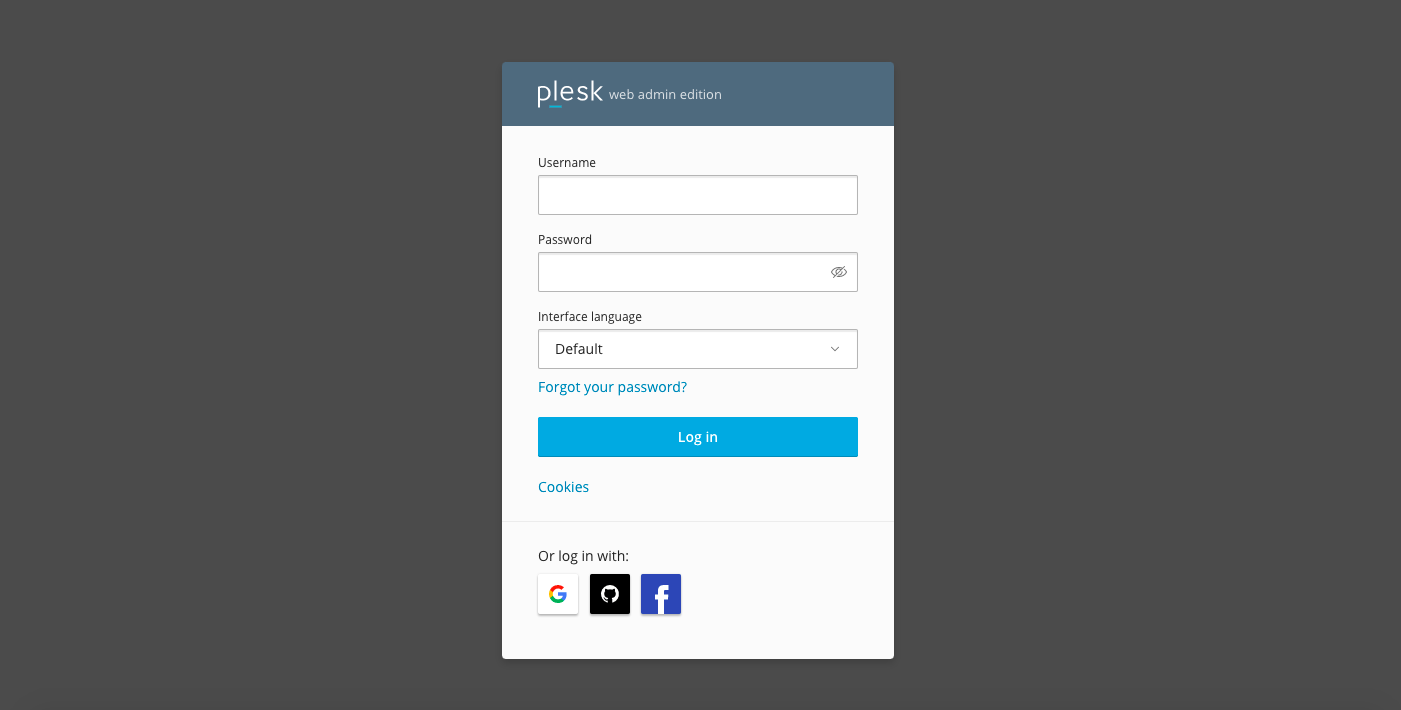
‣ Connect to your hosting panel:
![]()
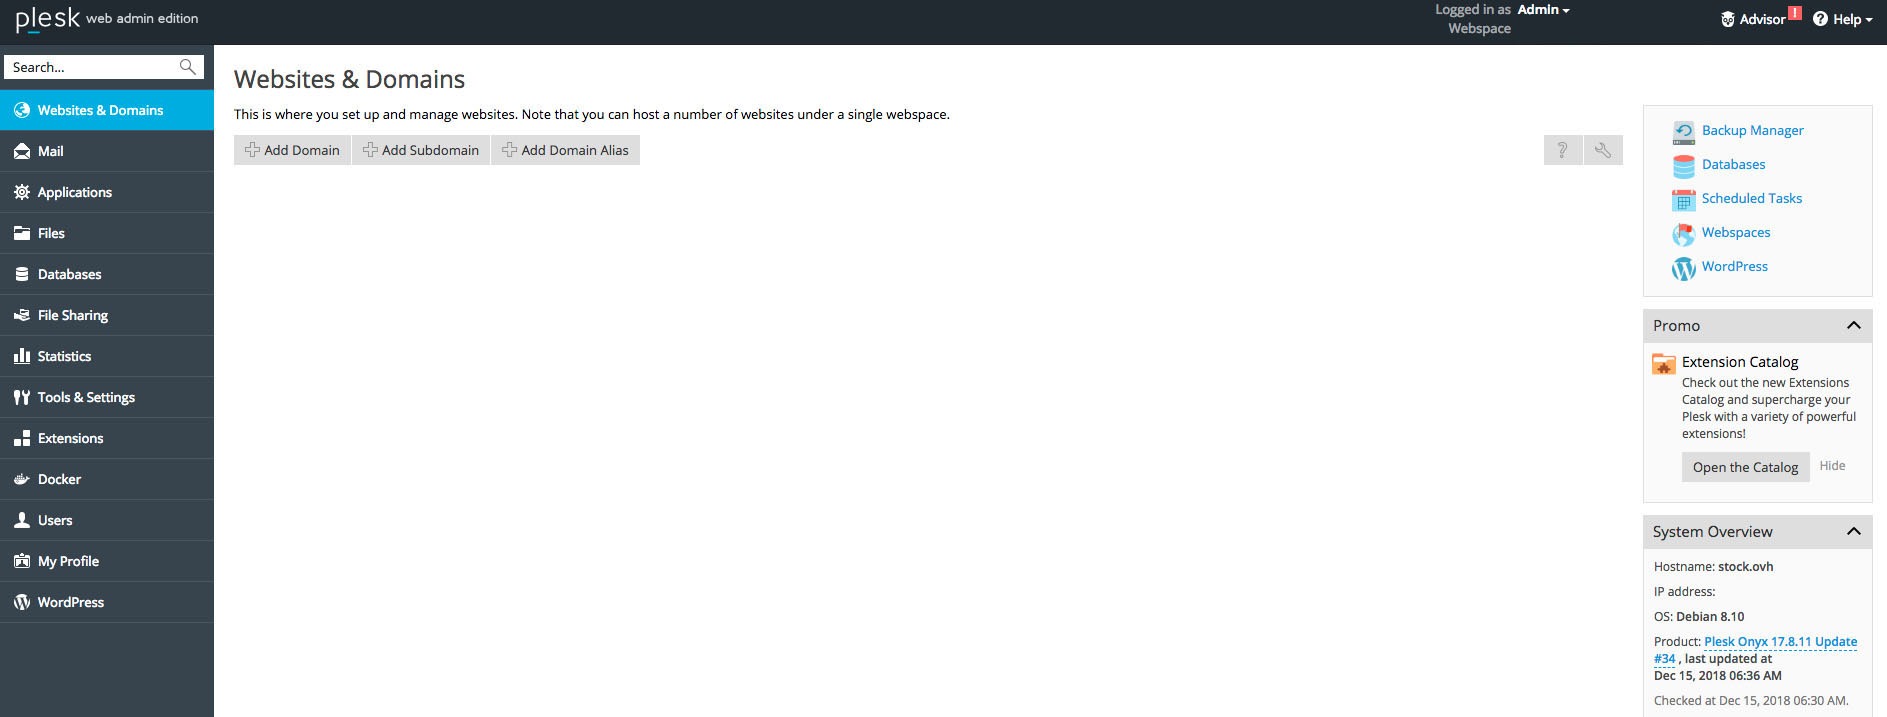
‣ To create the webspace for Siberian, click on ![]()
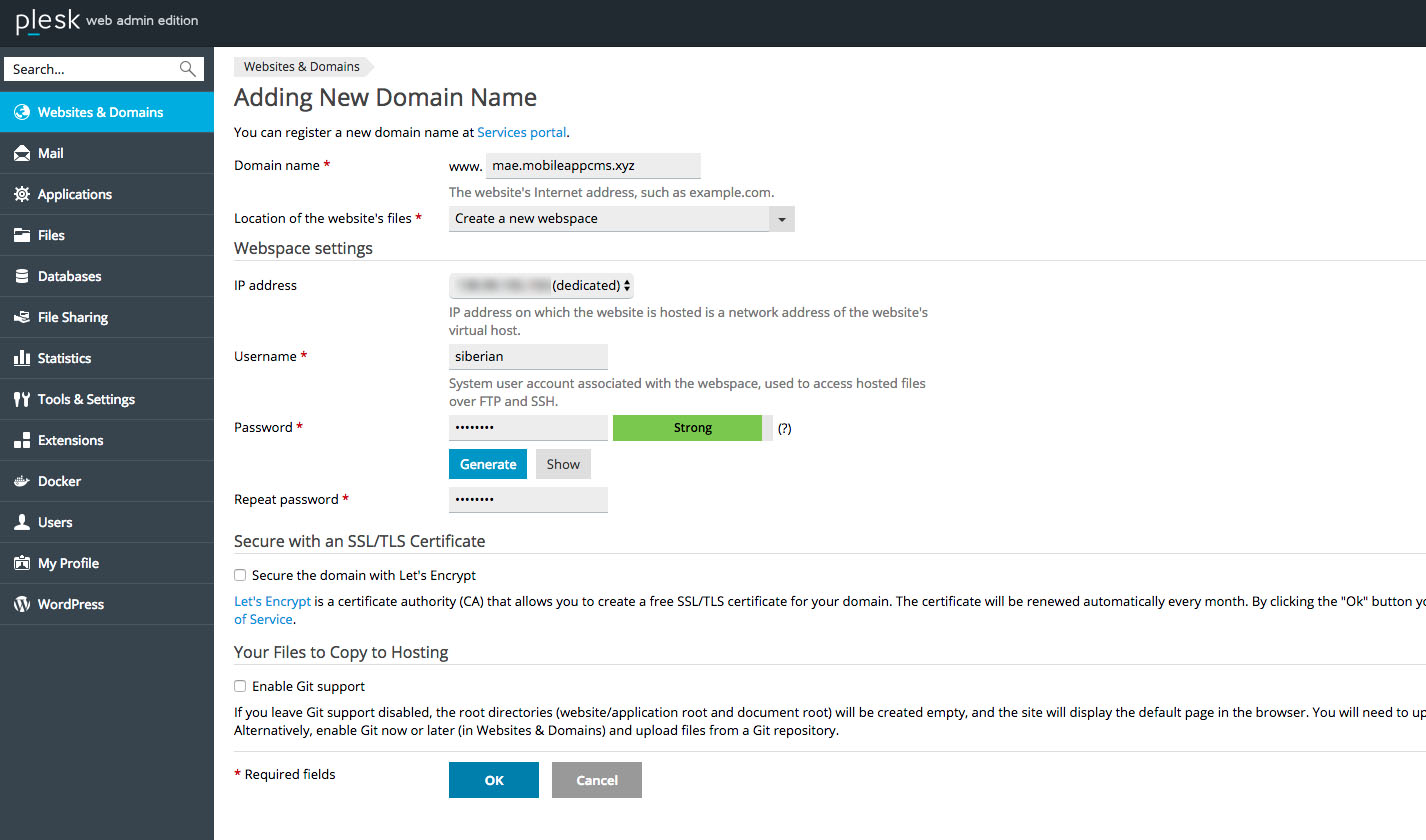
‣ Enter your Domain name in the first field.
‣ Choose “Create a new webspace” as it’s better to have Siberian in its own webspace.
‣ Then create your Username and Password. Keep them stored somewhere, as they can be useful for ftp access.
‣ Click on ![]() to create the Webspace. It should look like this:
to create the Webspace. It should look like this:
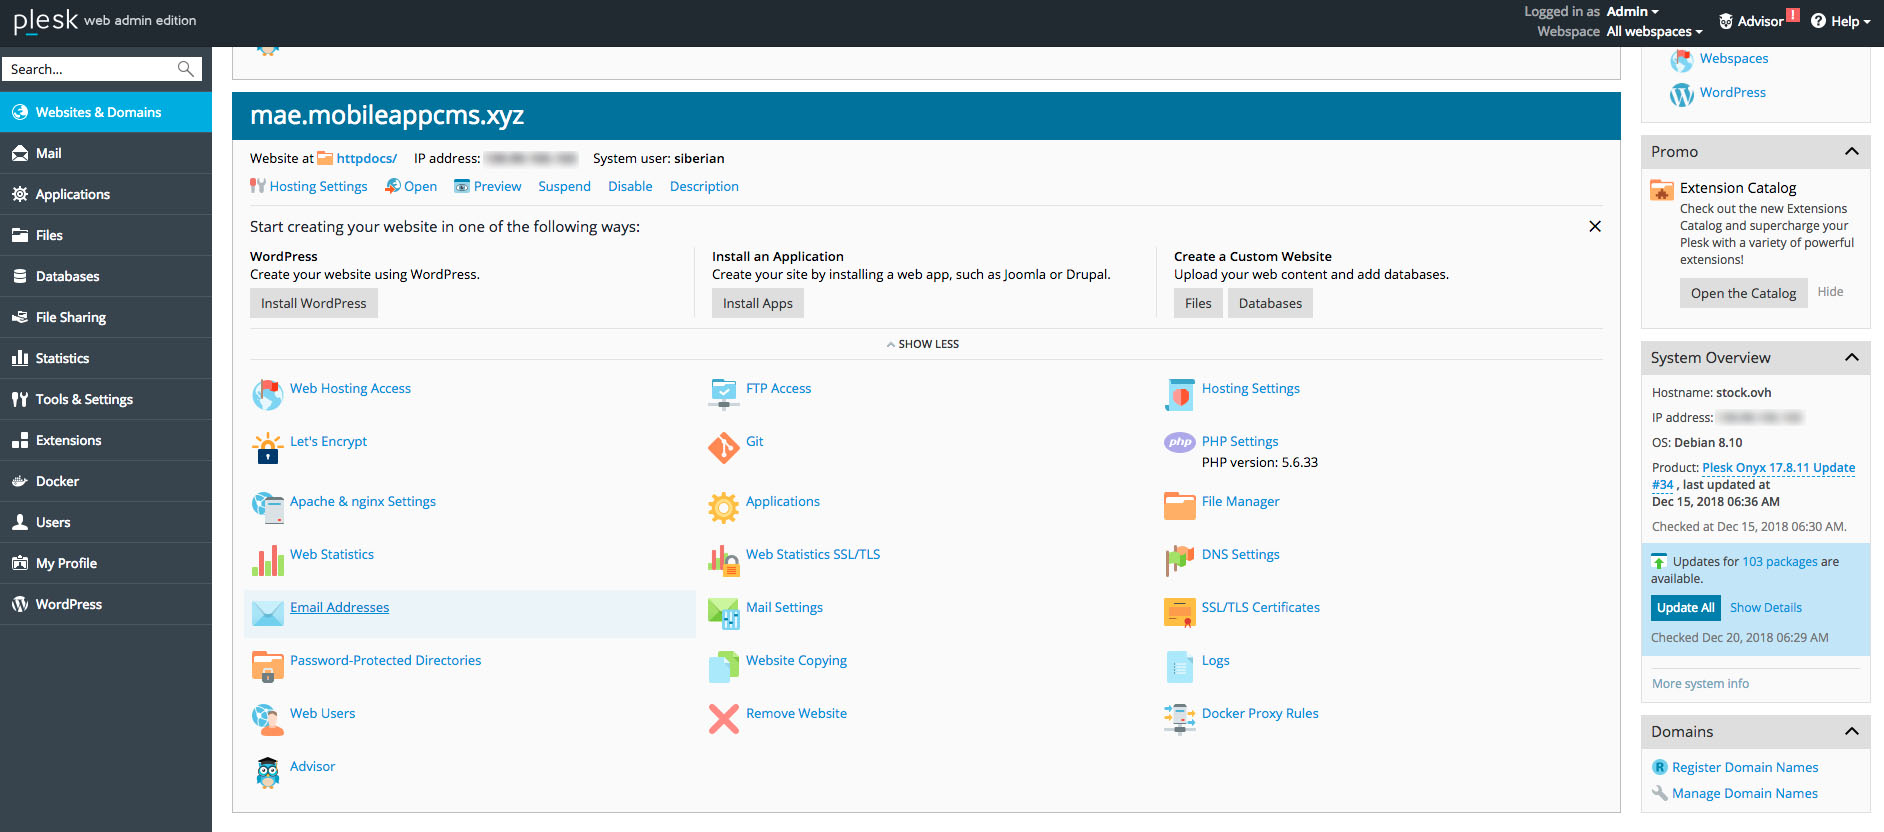
Now that your webspace is created, you will have to change some PHP Settings.
‣ First, click on ![]()
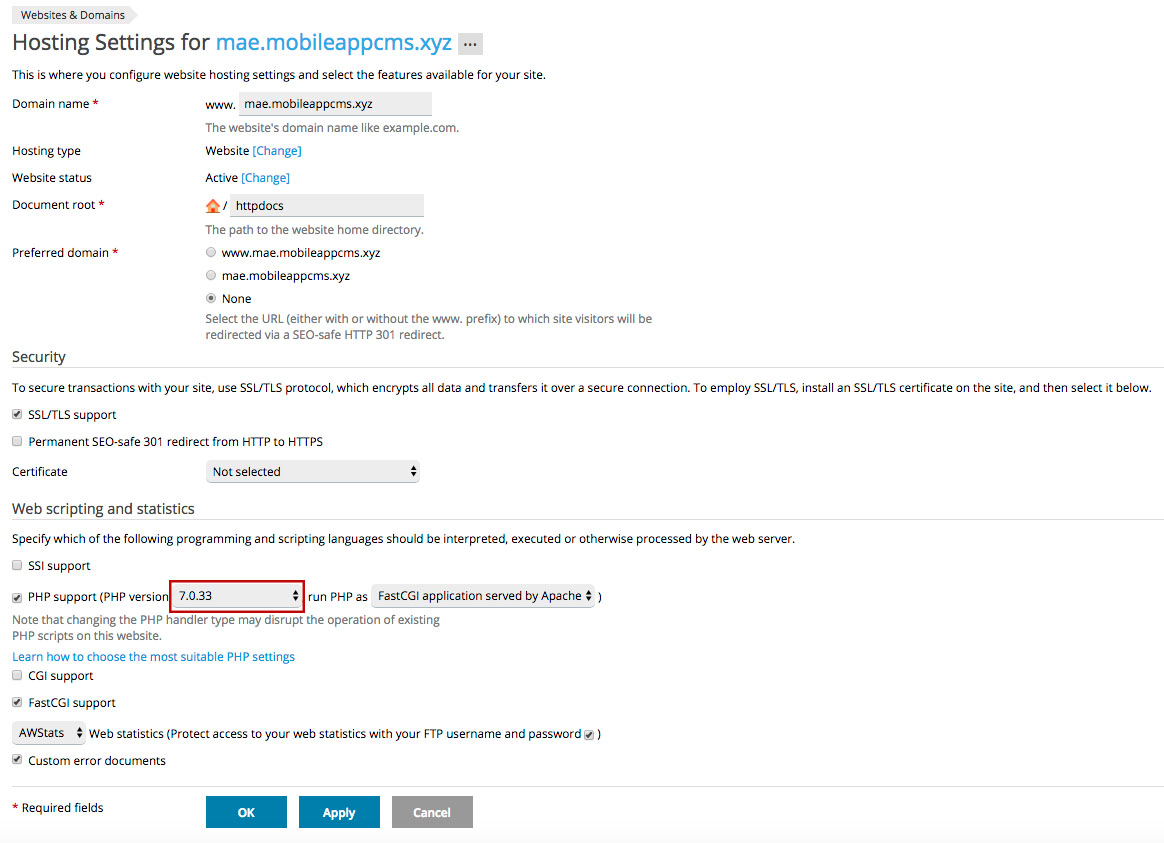
‣ You will have to change the PHP version, PHP 7.3 is recommended. It’s the version which is the most optimized for Siberian. Do not select PHP 7.4, it is not supported.
‣Select also FastCGI for “run PHP as”.
Note: in Security, do not check “Permanent SEO-safe 301 redirect from HTTP to HTTPS”.
‣ Press ![]() to save the changes
to save the changes
‣ Then click on ![]()
‣ Now click on 
All you have to change is on the “Performance and security settings” tab:
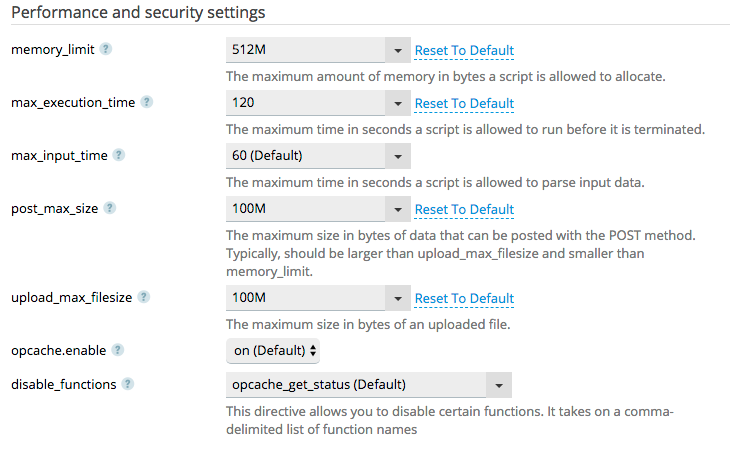
- “memory_limit“: Set it to 512M
- “max_execution_time“: Set it to 120
- “post_max_size“: Set it to 100M
- “upload_max_filesize“: Set it to 100M
‣ Press ![]() to save changes.
to save changes.
‣ Then click on ![]()
That’s all for PHP Settings.
For the Cron scheduler to work properly on your Siberian, there is a small modification to be done on your Plesk.
‣ Click on the left menu ![]()
‣ In “Tools & Resources” click on Scheduled Tasks
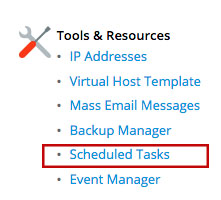
‣ Then click on ![]()
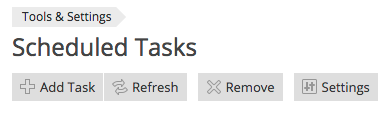
‣ For “Crontab shell” select /bin/bash

‣ Press ![]() to save changes.
to save changes.
‣ Then click on ![]()
To allow White Labels on your Platform Edition, you must first make some settings on your server.
‣ Click on the left menu ![]()
‣ In “Tools & Resources” click on IP Adresses
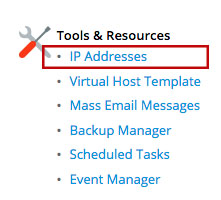
‣ Click on the IP address of your server
‣ For Default site select the domain of your Siberian

‣ Click on ![]()
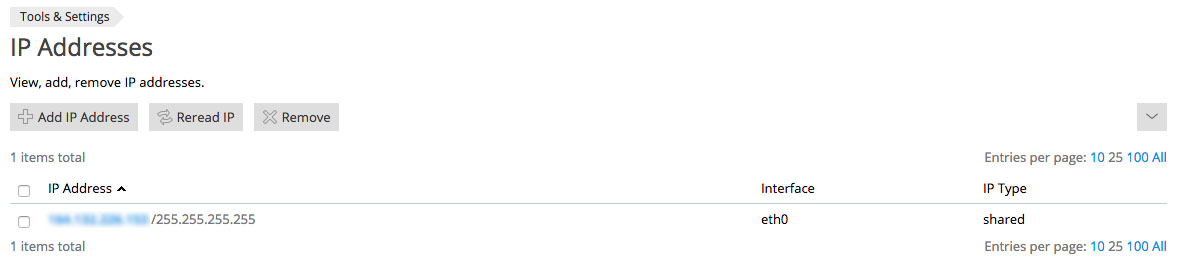
‣ Click on ![]() then on
then on ![]()
‣ Set the database name, and a user.
That’s it for the database.
‣ Click on ![]()

‣ Click on the checkbox highlighted above, and click on ![]() . The webspace should be empty.
. The webspace should be empty.
‣ Now upload the index.php by Drag&Drop or with the button ![]() .
.
‣ Once you have uploaded the index.php installation file on your website, you can reach the URL of your website from your browser: in my case: “http://mae.mobileappcms.xyz”
![]()
From the page, you will see:
| On Single App Edition: | On Multi Apps and Platform Edition: |
|---|---|
 |
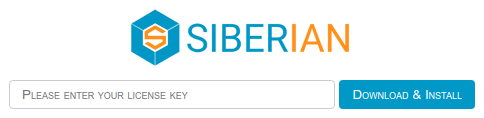 |
‣ If required, enter your license number
You can find your license number in your purchase confirmation mail.
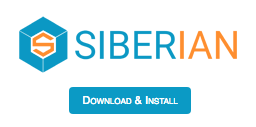
‣ To start the installation, click on Download & Install
‣ Click on ›

https://doc.siberiancms.com/
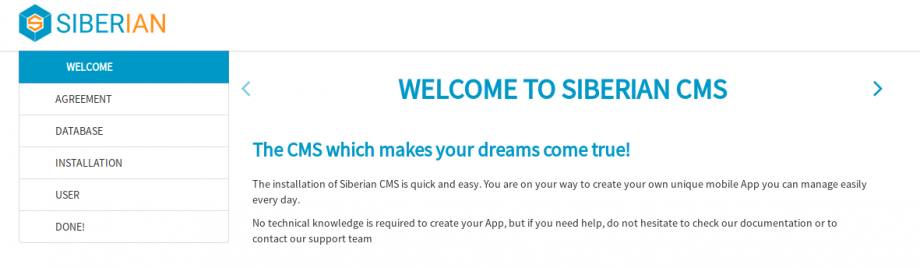
‣ Read the Terms and conditions, tick the box if you agree, and click on ›

‣ Fill in the database credentials you set up earlier. “Host” is localhost, unless you want to use a distant database.
‣ Then click on ›

‣ Create you user account, then click on ›
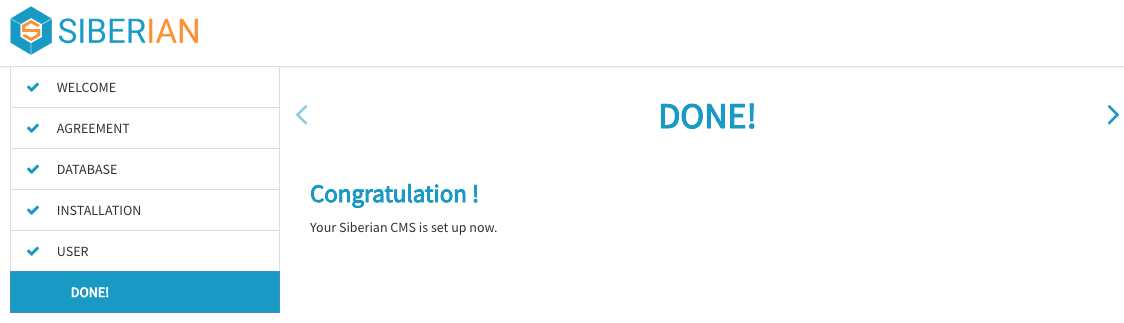
Congratulations, your Siberian is installed !
‣ You can reach your editor with your domain name, http://mae.mobileappcms.xyz in my case.
![]()
‣ You can reach your backoffice by adding /backoffice to your domain name, https://mae.mobileappcms.xyz/backoffice in my case.
![]()
From your backoffice, you can now configure your SiberianCMS.
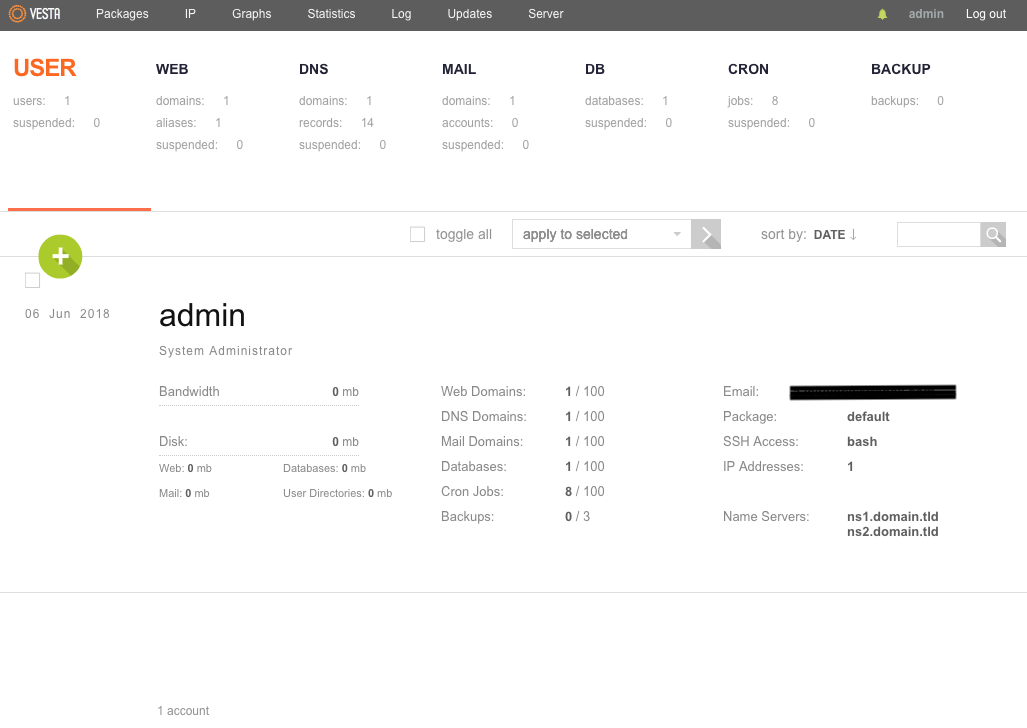
1.b.b.VestaCP
First of all, Siberian CMS is a self-hosted platform. That means you must have a web hosting, and it has to meet the requirements to install Siberian CMS correctly.
The installation, step by step
Installation of Siberian CMS on a VestaCP
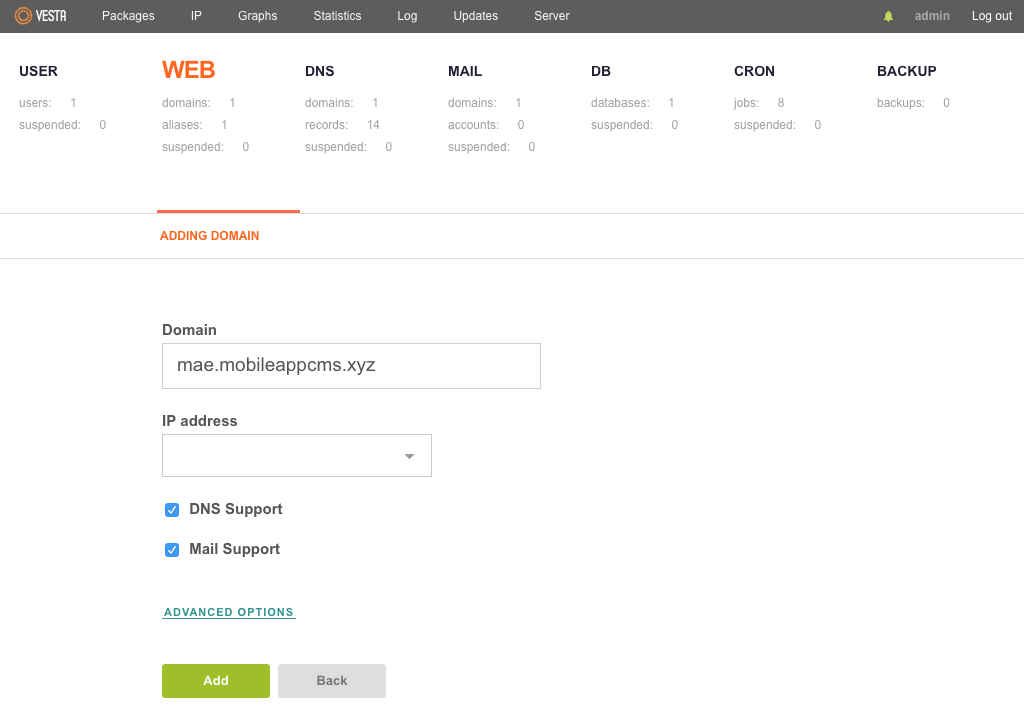
Unzip the installation zip file. There is just one small index.php file, it is normal, all the files needed to install Siberian will be downloaded from our servers to your server thanks to this file. Connect to your hosting panel:
To create the webspace for Siberian, click on  in the “Web” section:
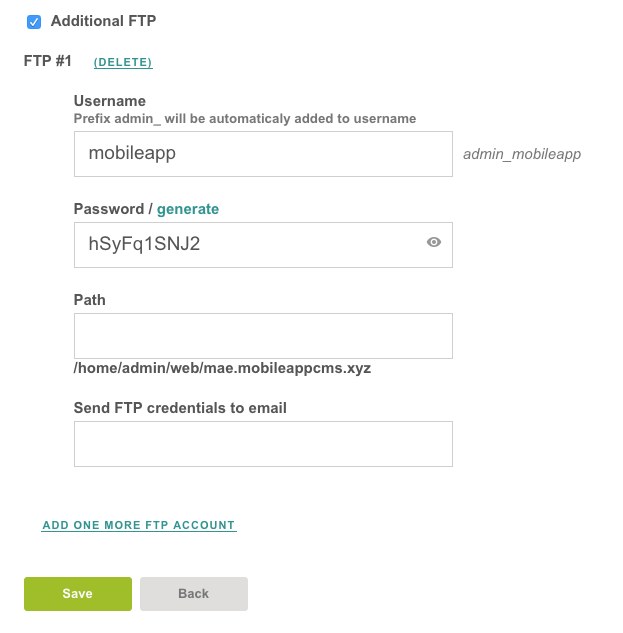
Then click on “Advanced options” and tick “Additional FTP” to create a ftp access to the webspace:
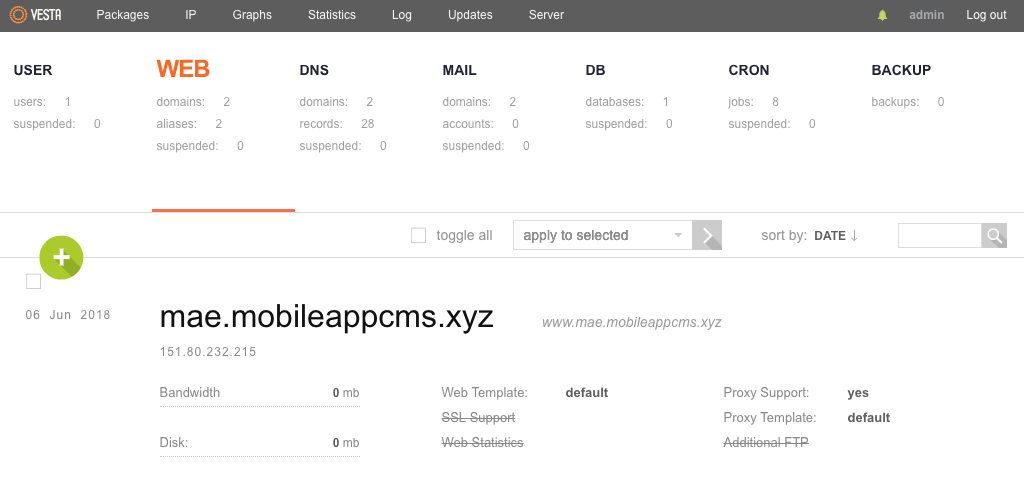
Finally, click on ![]() :
:
Now that your webspace is created, you will have to change some PHP Settings. First, click on ![]() >
> ![]() in the “httpd Web server” section >
in the “httpd Web server” section > ![]() :
:

- “memory_limit“: Set it to 512M
- “max_execution_time“: Set it to 120
- “post_max_size“: Set it to 100M
- “upload_max_filesize“: Set it to 100M
And then click on ![]() to save changes. That’s all for PHP Settings.
to save changes. That’s all for PHP Settings.
Click on 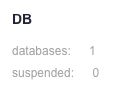 and
and  :
:
Type the name, the user and the password, then click on ![]()
To upload index.php in the webspace, we will use FileZilla:

To connect to your webspace, use the FTP you just created. The “Host” is the IP address of your server. Leave the port as default (blank).
Delete all of the files in the folder “public_html” on the right (it’s the webspace).
Find index.php on the left (it’s your computer) and drag it to the right in the “public_html” folder:
That’s it, you can now start the installation of Siberian.
‣ Once you have uploaded the index.php installation file on your website, you can reach the URL of your website from your browser: in my case: “http://demo1.mobileappcms.xyz”
![]()
From the page, you will see:
| On Single App Edition: | On Multi Apps and Platform Edition: |
|---|---|
|
|
‣ If required, enter your license number
You can find your license number in your purchase confirmation mail.
‣ To start the installation, click on Download & Install
‣ Click on ›
https://doc.siberiancms.com/
‣ Read the Terms and conditions, tick the box if you agree, and click on ›
‣ Fill in the database credentials you set up earlier. “Host” is localhost, unless you want to use a distant database.
‣ Then click on ›
‣ Create you user account, then click on ›
Congratulations, your Siberian is installed !
‣ You can reach your editor with your domain name, http://demo1.mobileappcms.xyz in my case.
![]()
‣ You can reach your backoffice by adding /backoffice to your domain name, https://demo1.mobileappcms.xyz/backoffice in my case.
![]()
From your backoffice, you can now configure your SiberianCMS.
1.b.c.How to install Siberian with WHM/cPanel
First of all, Siberian CMS is a self-hosted platform. That means you must have a web hosting, and it has to meet the requirements to install Siberian CMS correctly.
The installation, step by step
Installation of Siberian CMS on a WHM/cPanel
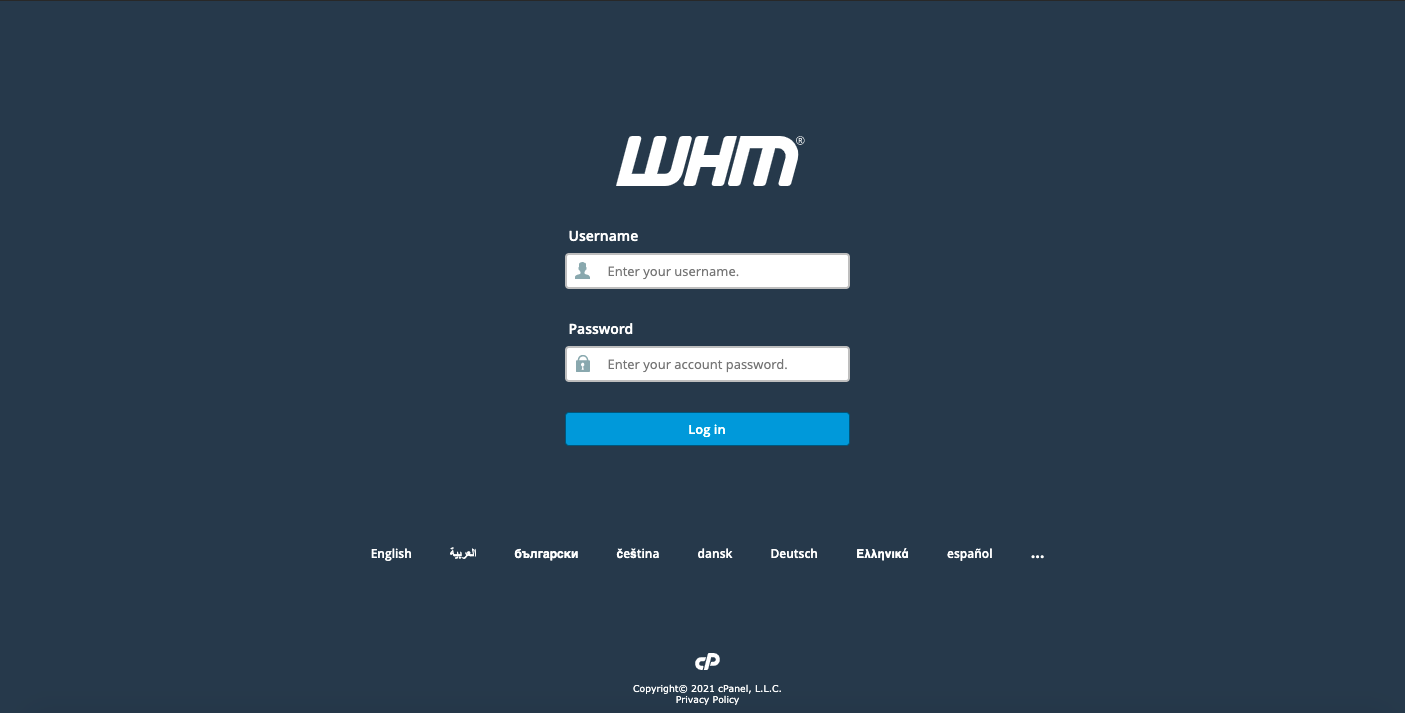
Unzip the installation zip file. There is just one small index.php file, it is normal, all the files needed to install Siberian will be downloaded from our servers to your server thanks to this file. Connect to your hosting panel:
![]()
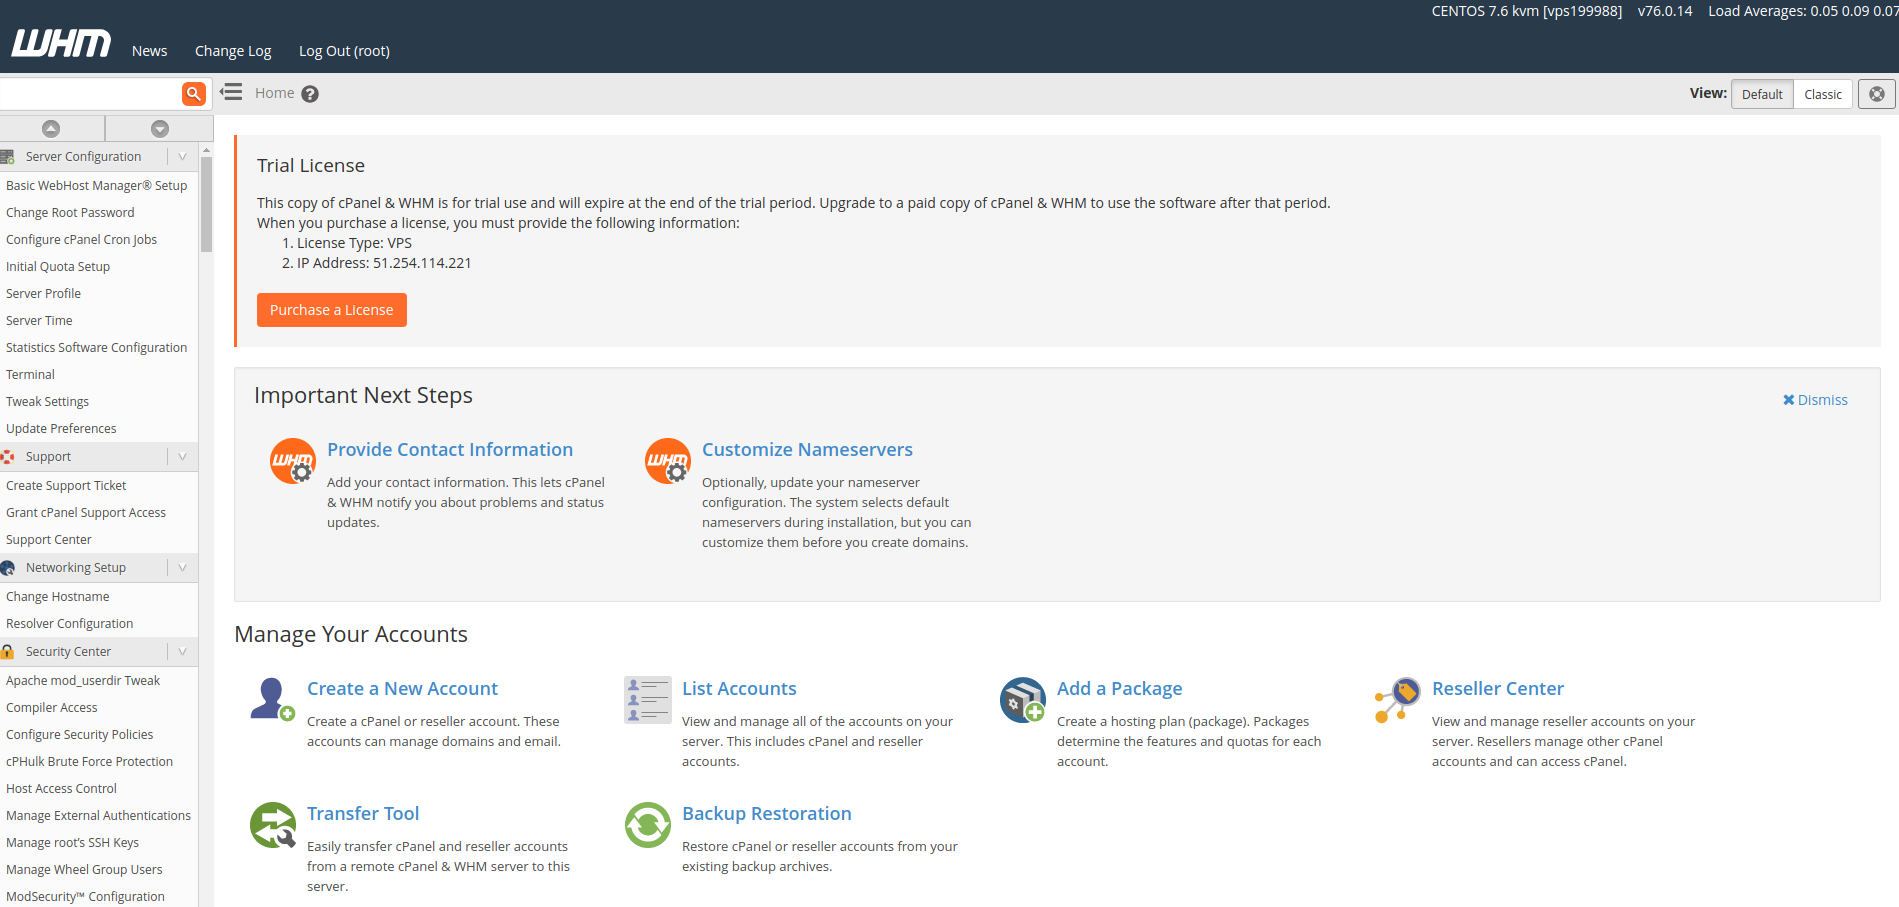
To create the webspace for Siberian, you first have to create an Account. In the top left, type “Create a New Account” and click on the button that will show up. Then fill the fields in the “Domain Information” section:

You can change the other settings below “Package” section, if you know what you are doing, otherwise you can leave them by default. Then hit the ![]() button.
button.
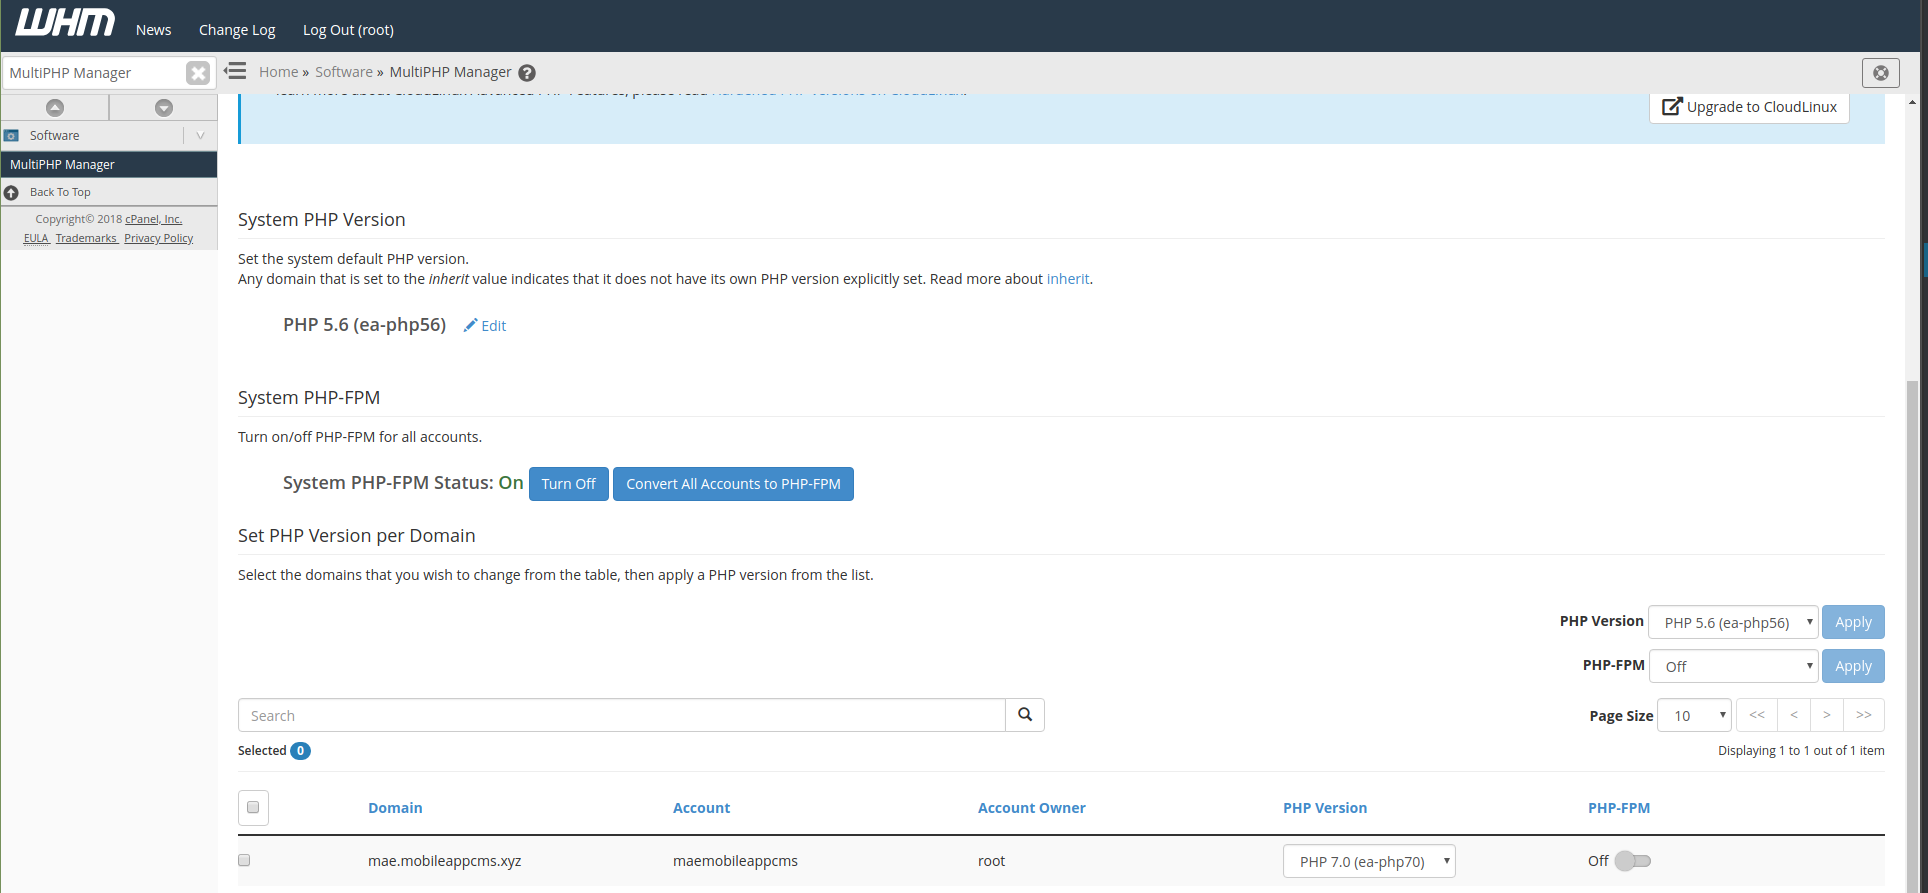
‣ Search for “MultiPHP Manager” in the search field at the top left of the screen. Scroll down, and select PHP 7.3 for your webspace. You also have to disable PHP-FPM:
‣ Then search for “MultiPHP INI Editor” in the search field. Select “ea-php73“:
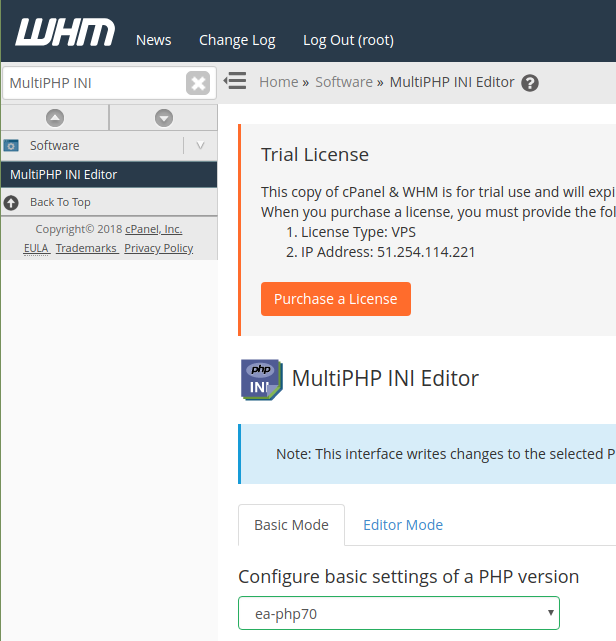
‣ Enable “allow_url_fopen”:

‣ Then follow the values of this screenshot:
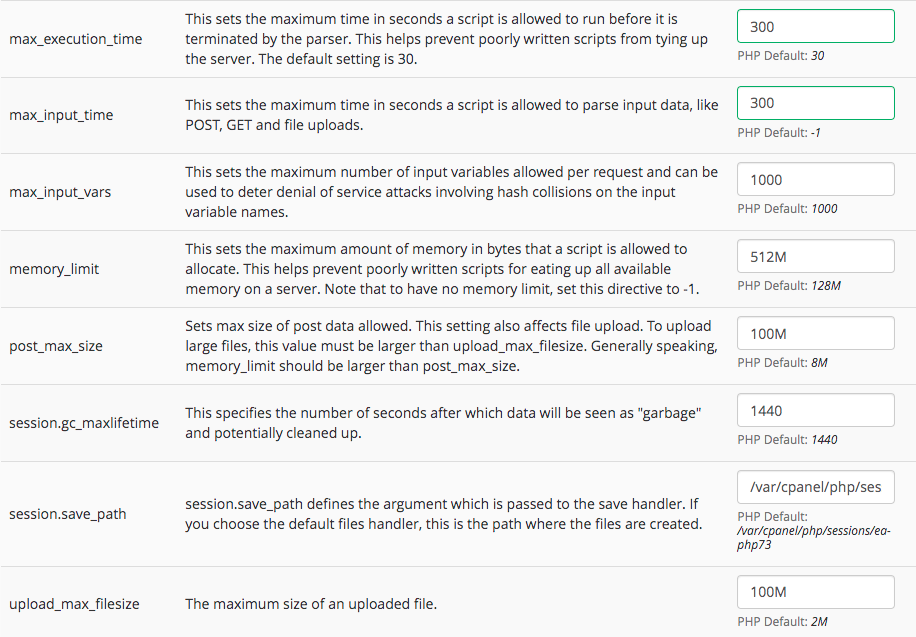
‣ Finally, hit the ![]() button.
button.
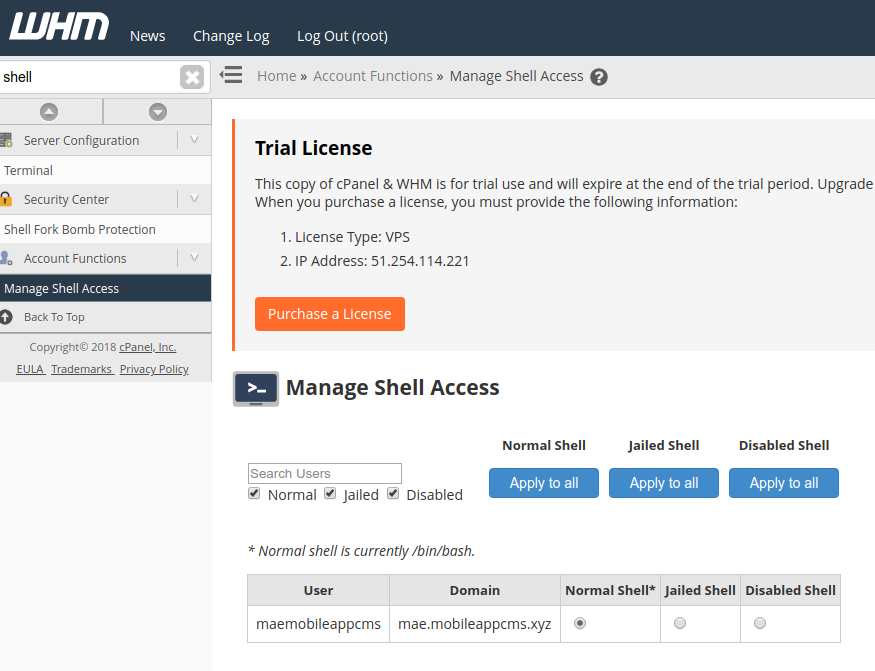
‣ First you have to set the “Shell Access” to Normal. Type “shell” in the search bar at the top left of the screen, then click on “Manage Shell Access”. Make sure that your Domain is on Normal Shell, which is set to /bin/bash:
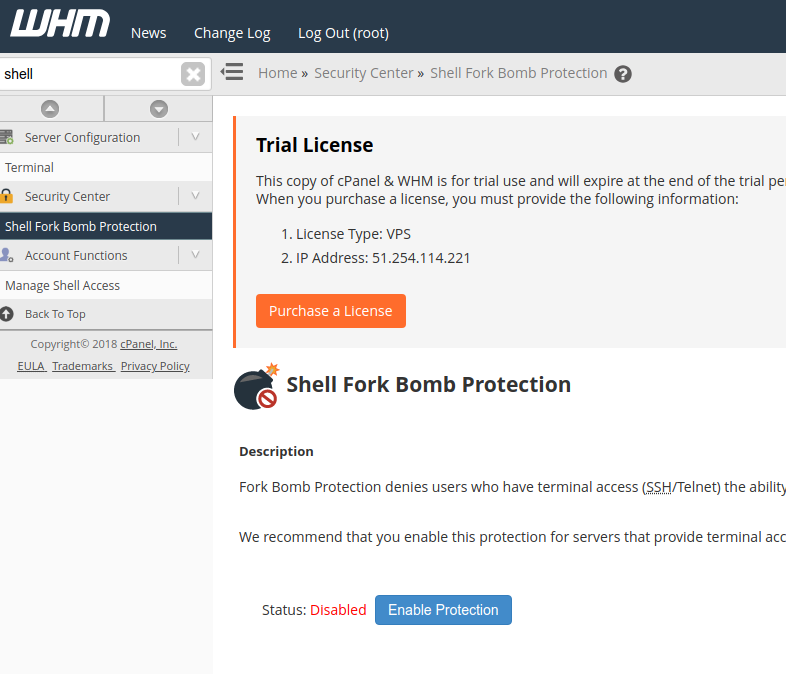
‣ Then, still on the same page, click on “Shell Fork Bomb Protection” in the left menu. Make sure the protection is Disabled:
‣ Next, you have to check if all the required PHP extensions are correctly installed. Search for “EasyApache 4” in the search field. Click on ![]() next to “Currently Installed Packages”. Select “PHP Extensions” in the left menu, then Filter only php73:
next to “Currently Installed Packages”. Select “PHP Extensions” in the left menu, then Filter only php73:
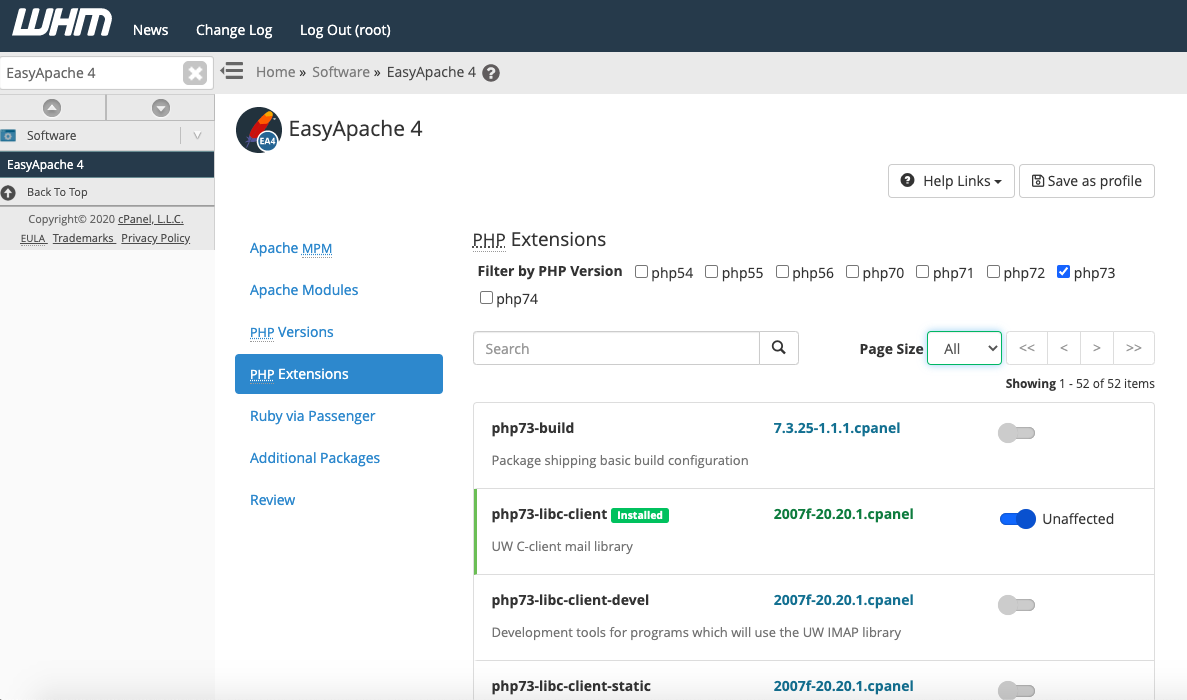
‣ If a PHP extension is not installed (ex: iconv), then you have to click on the grey button at the right, to make it blue. Once you have reviewed all of the PHP Extensions (in my screenshot, 52 extensions, 5 pages), click on “Review” in the left menu > ![]() >
> ![]()
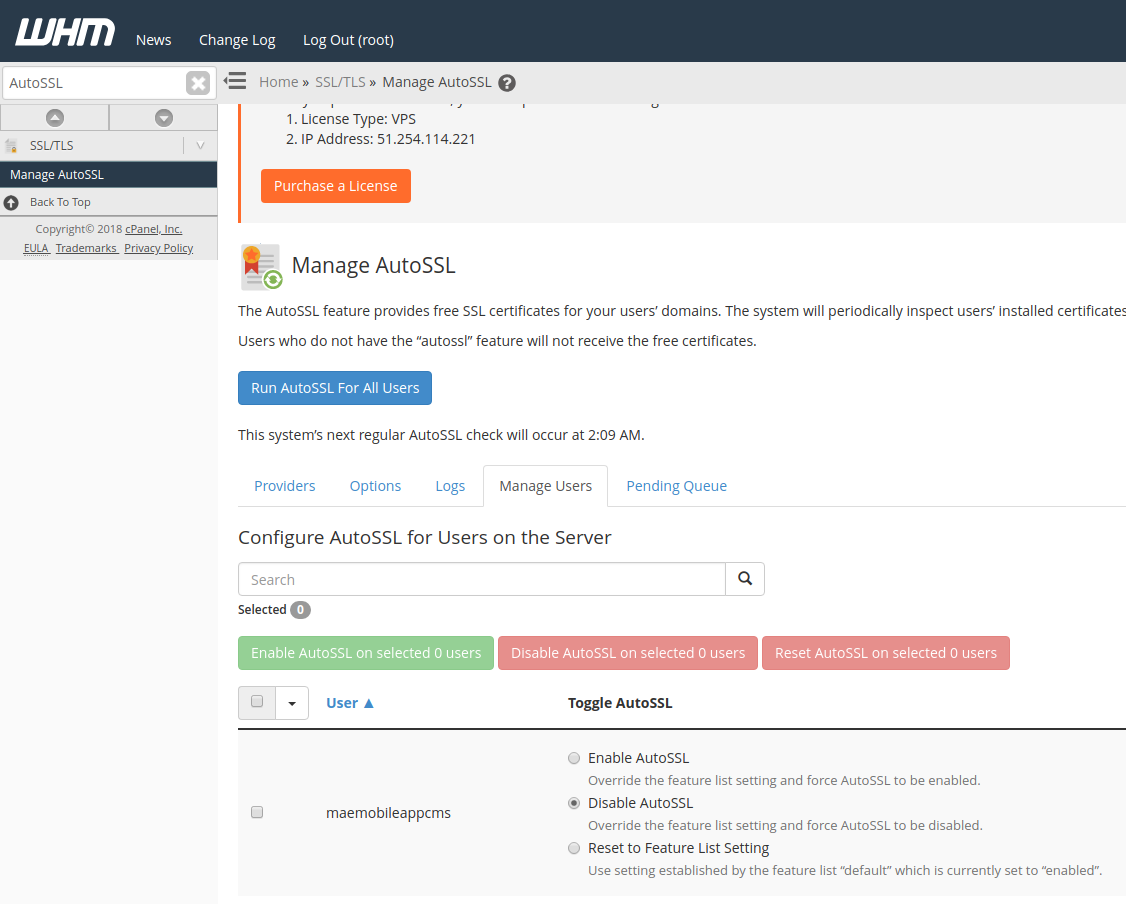
‣ Now, we are going to deactivate AutoSSL for our domain. Search for “AutoSSL” in the search field, then click on the “Manage Users” section. Search for your domain, then click on “Disable AutoSSL”:
‣ Search for “Manage SSL” in the search field:
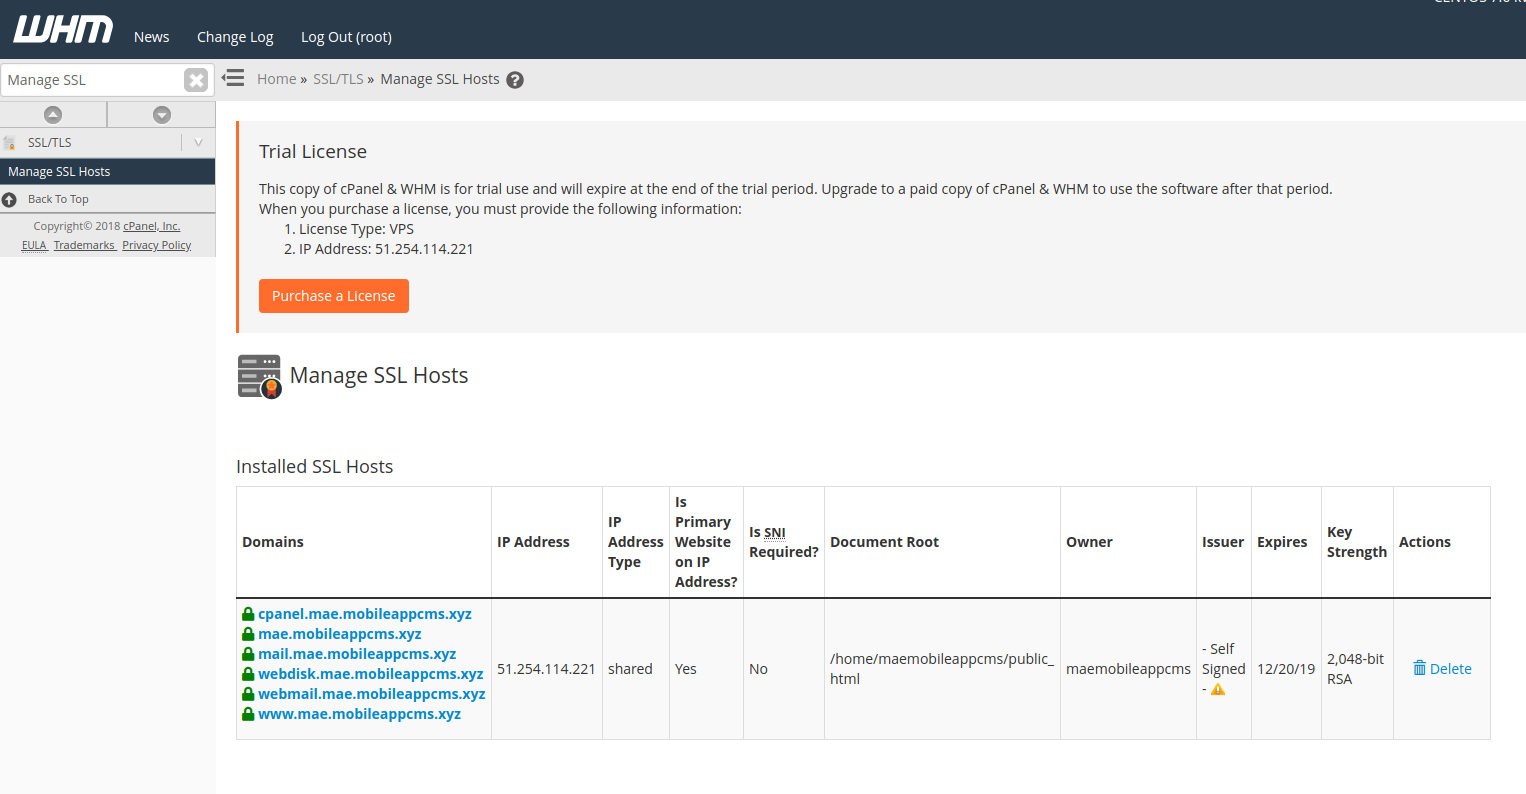
‣ Delete the SSL certificate linked to your Domain.
‣ If you are a Platform Edition owner, you will have to configure WHM to allow White-Labels.
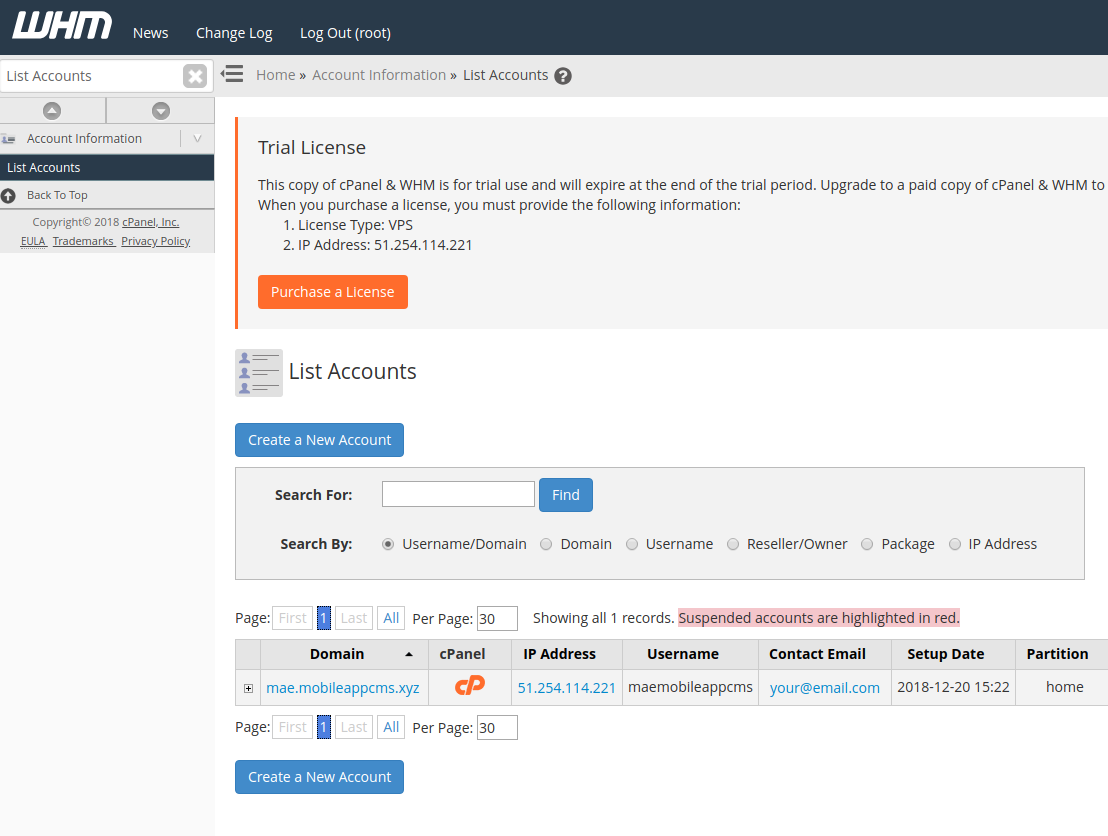
‣ For the next parts, we are going to move to cPanel. Search for “List Accounts” in the search field. Next to your Domain, you have a cPanel logo. Click on it to reach cPanel:
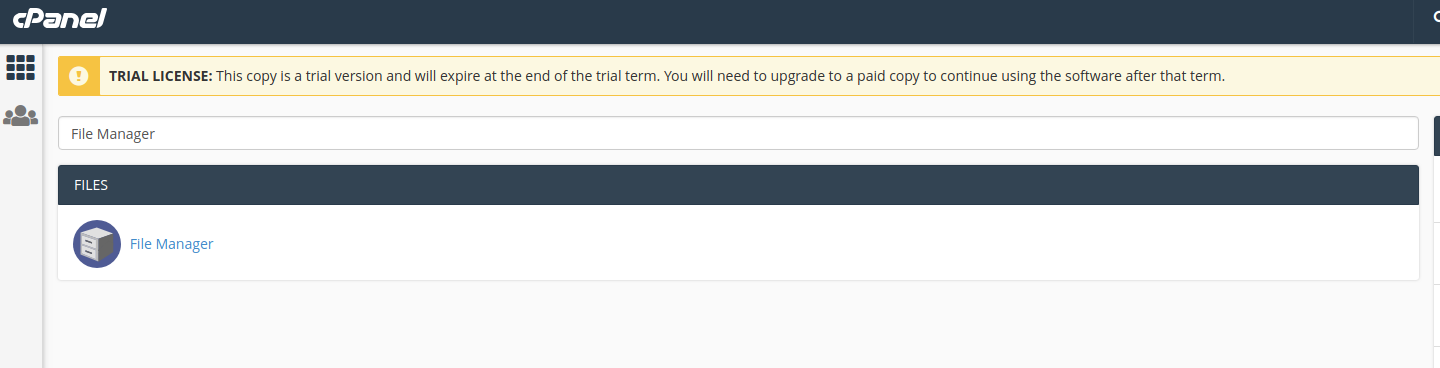
‣ Search for “File Manager” in the search field at the top of cPanel:
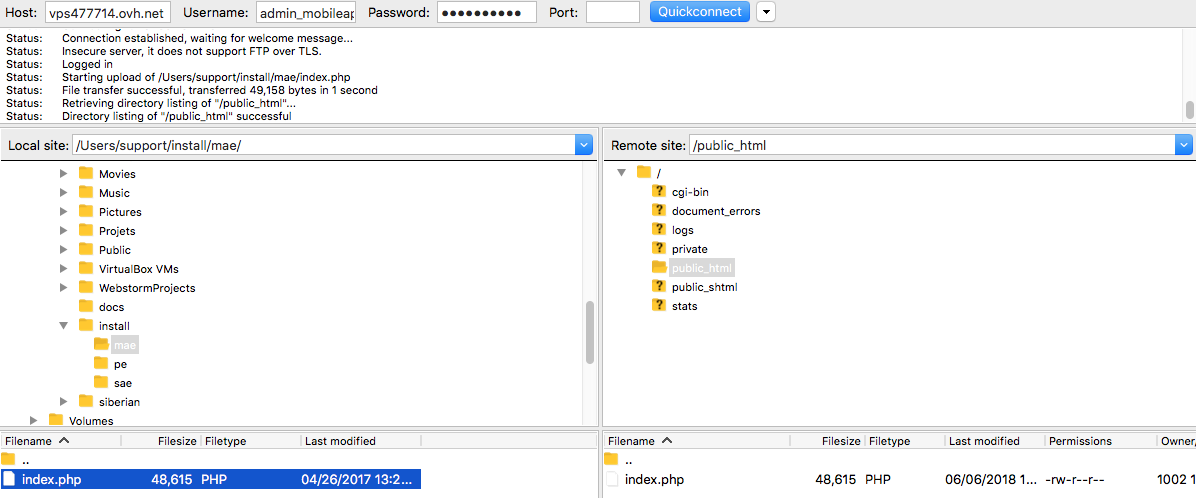
‣ Navigate to “public_html” folder, then click on the “Upload” button:
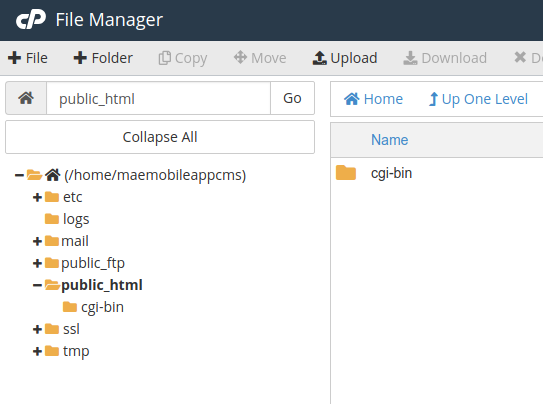
‣ Select your index.php, then go back to cPanel.
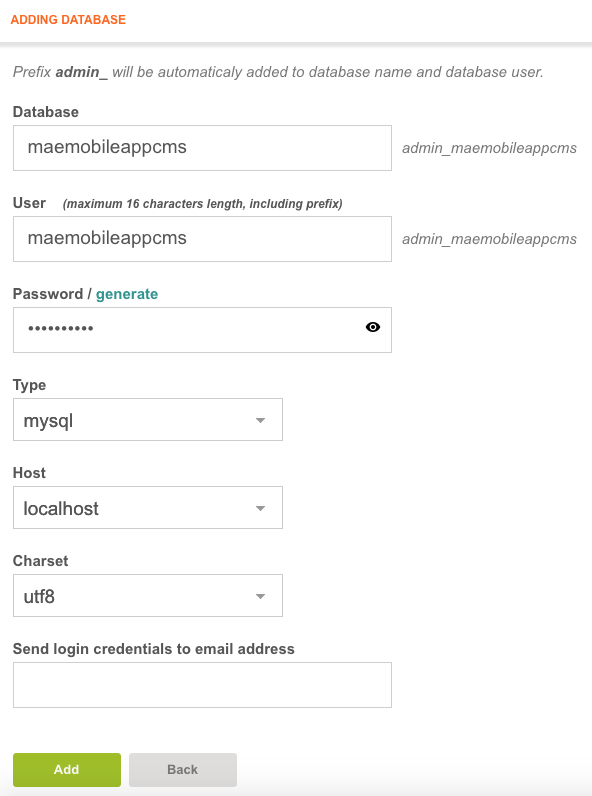
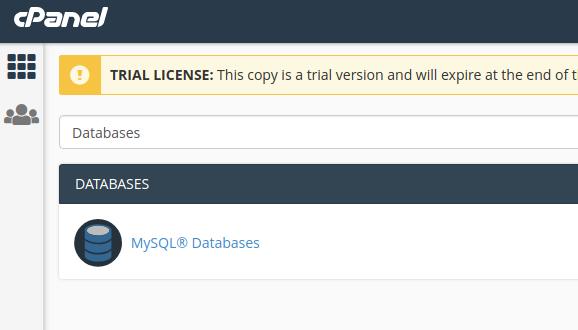
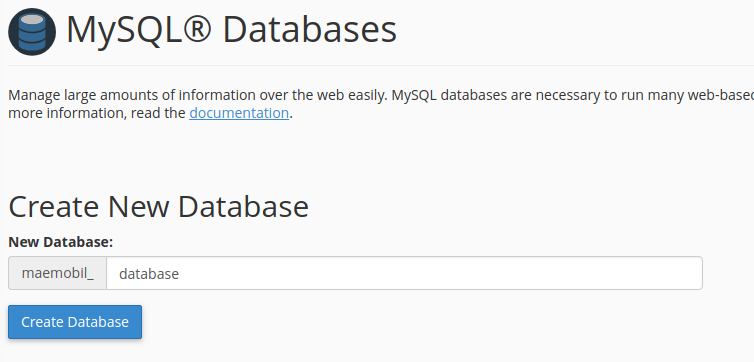
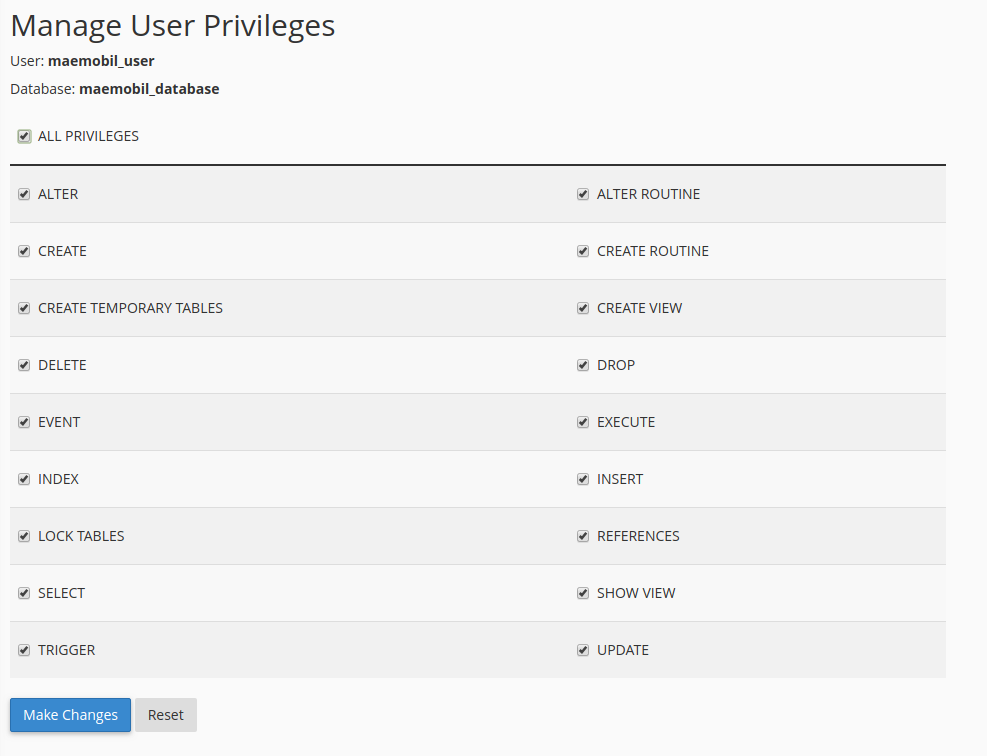
‣ Search for “Databases” in the search field:
‣ Enter a name for the new database, and click on ![]() :
:
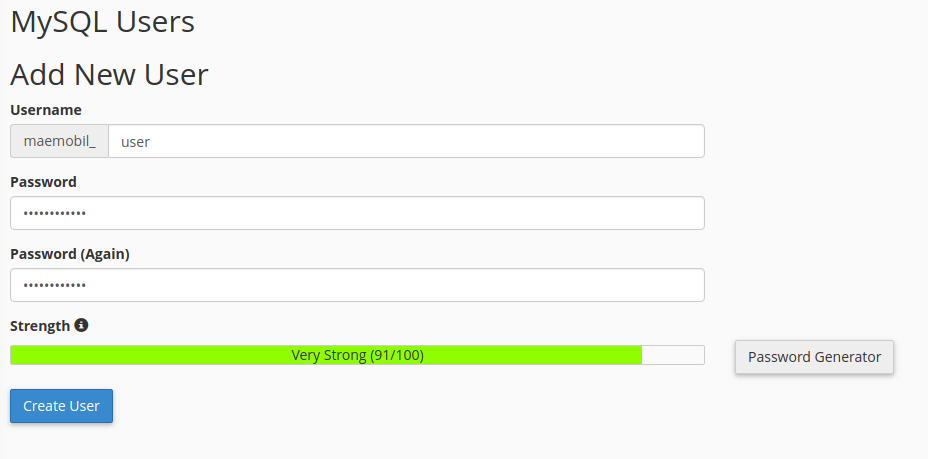
‣ Create the user:
‣ Finally, add the user to the database:
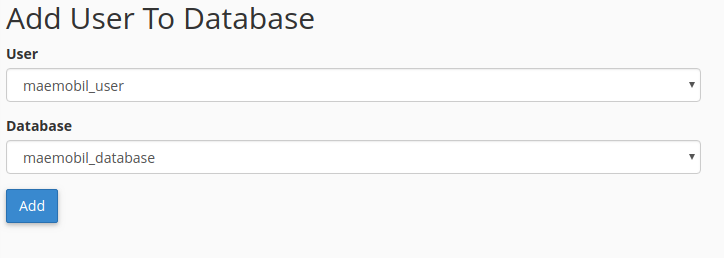
‣ Select all privileges, and click on ![]() :
:
‣ Once you have uploaded the index.php installation file on your website, you can reach the URL of your website from your browser: in my case: “http://demo1.mobileappcms.xyz”
![]()
From the page, you will see:
| On Single App Edition: | On Multi Apps and Platform Edition: |
|---|---|
|
|
‣ If required, enter your license number
You can find your license number in your purchase confirmation mail.
‣ To start the installation, click on Download & Install
‣ Click on ›
https://doc.siberiancms.com/
‣ Read the Terms and conditions, tick the box if you agree, and click on ›
‣ Fill in the database credentials you set up earlier. “Host” is localhost, unless you want to use a distant database.
‣ Then click on ›
‣ Create you user account, then click on ›
Congratulations, your Siberian is installed !
‣ You can reach your editor with your domain name, http://demo1.mobileappcms.xyz in my case.
![]()
‣ You can reach your backoffice by adding /backoffice to your domain name, https://demo1.mobileappcms.xyz/backoffice in my case.
![]()
From your backoffice, you can now configure your SiberianCMS.
2.Configuring SiberianCMS
Now your Siberian is installed, you have to configure it.
All the steps listed must be performed to make your Siberian ready for creating apps.
As always, if you have questions about some parts, feel free to send us an email to contact@siberiancms.com, our support team is ready to answer them.
2.a.General settings of your Siberian
From Backoffice > Settings > General, you can add some informations and set some options, we will review them per sections:
-
-
Your Platform
- Platform Name: this name will be shown on the login page and used in emails.
- Main siberian domain: fill this with your Siberian domain name, for instance: app.siberiancms.com.
- Location settings: Set your timezone, currency and the default language.
- Privacy settings: Has to be activated if your country is a member or European Union.
- Licenses: Insert here the Siberian license number sent to you in your purchase confirmation mail. If not set or invalid, you won’t be able to update your Siberian
-
-
-
Your company
- Those informations will be used in the invoices generated by your Siberian.
-
-
-
Whitelabel Settings (only for PE)
- Sign-up mode: determines the account creation flow from the editor login page.
- None: Sign up tab won’t be displayed
- Validation: each account created must be activated from the backoffice
- Full: account created can start to build an app right after their creation.
- Terms of Service: Allows you to specify the ToS of your while labels.
- Sign-up mode: determines the account creation flow from the editor login page.
-
-
-
Your Applications
- Application base Package Name & Bundle ID: defines the prefix of your apps Package Name & Bundle ID. for instance : xyz.mobileappcms.pe.android or xyz.mobileappcms.pe.ios. Package names and bundle ID are used in Android and iOS app stores to identify the apps.
- Import / export features: this set the permissions for your users for those topics.
- Publication access type:
- sources code: user can download the app source code and edit them or build them.
- info: users give you the required information to publish their applications on their behalf
- Free trial (PE only): The time span in which an app can be used/modified. If you want to set a free trial period, check “Enable free trial” and enter a trial duration in days. If you want your users to be able to use the editor without trial or subscription, check “Allow access to editor regardless the free trial or subscription”.
- APK Generator for builds from the Editor (Local or Service): Local Apk generator is the apk generator on your server, Service Apk generator is on our server.
- Default privacy policy: you can customize the default privacy policies that will be displayed in your apps. They will be editable per app from the editor.
- Default privacy policy section for GDPR: if you have enabled Enable GDPR features & rules, you can edit the privacy policies here.
-
-
-
Analytics
- App limit for displaying real data: Until this number is reached on the editor user’s app list, analytics will be in demo mode, with demo values.
-
-
Advertising
- Force all apps to use Owner AdMob: if set to yes, all apps will use the platform admob account.
- Split Ad revenue : set the % of ads that will be displayed in apps using your account.
2.b.How to update your Siberian
It is highly recommended to update your Siberian right after having installed it.
Then, while a new update is released, a message is sent on your backoffice dashboard:
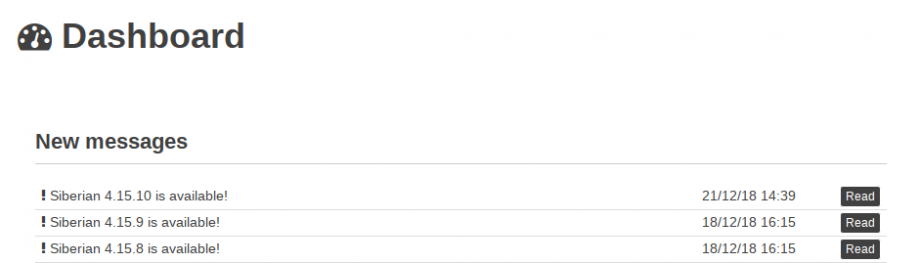
To install this update, the process is very simple:
2.c.How to translate your Siberian and add languages
- Download the package then install it from your Backoffice in Settings > Updates & Modules page.
- Go to your Backoffice, in Settings > Translations, you can see the language you just added.
- You can check if some translations are missing, or editing the translations, by looking at each translation files or searching terms with the search function.
Of course, you can add a language from the Backoffice and make the translations in each translation files.
If you want to add a language, go to your Backoffice > Settings > Translations, then on click on the “+” icon and select a language. Then click to edit and enter your translations.
2.d.How to Set up Theme and Logo
From Backoffice > Appearance > General, you can change the Backoffice Theme and set your logo and favicon.
- The Theme selector allows you to chose between the available themes:

- To change the backoffice page title:
As indicated, You can change the browser tab title with the translations: in Settings > Translations, edit the “Backoffice” file and translate “Siberian – Backoffice” for each language available on your Siberian. Please refer to the translations documentation.
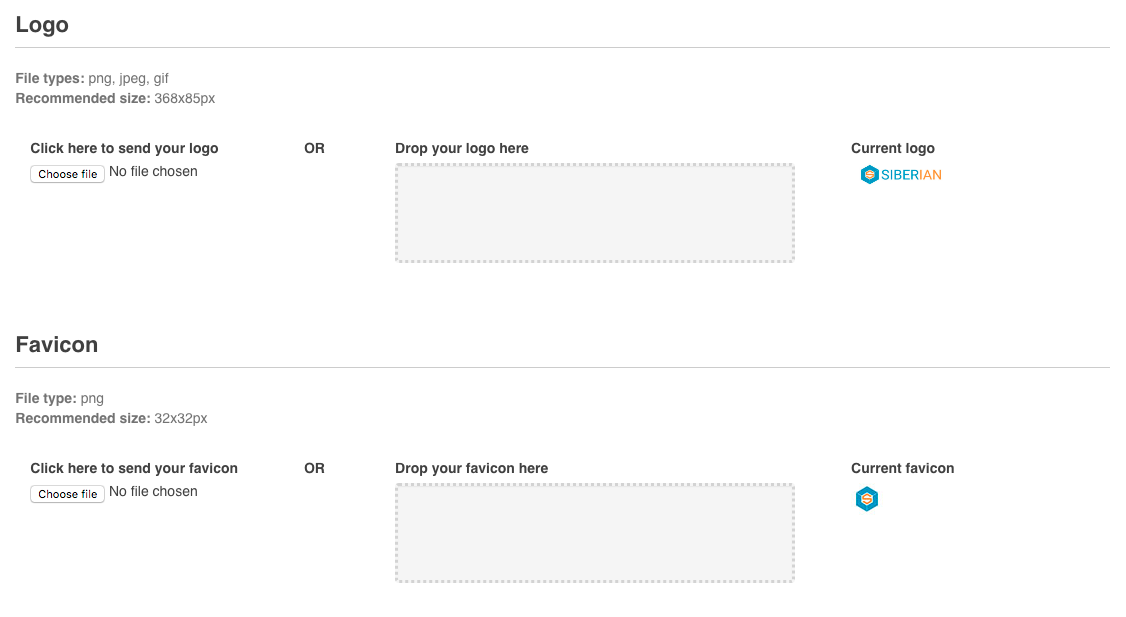
- To change the Editor logo and favicon:
Upload your logo and favicon using the image uploader, following the file type and recommended size indications. This logo will be displayed on the Editor login page.
![]()
- To change the backoffice logo and favicon:
Upload your logo and favicon using the image uploader as previously.
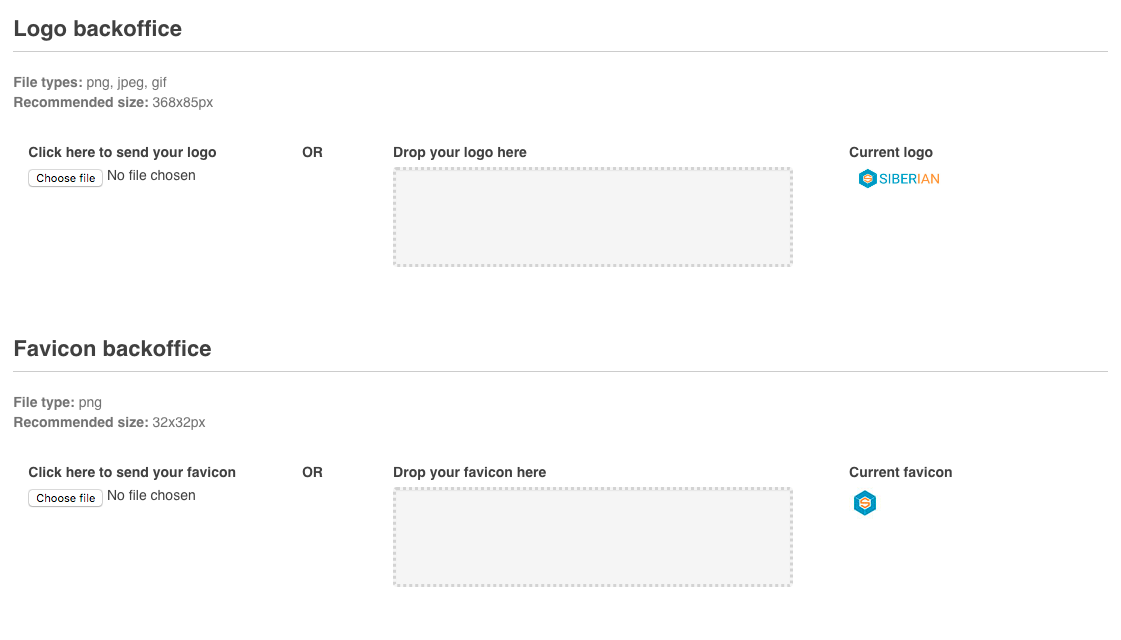
Once uploaded, the favicon is displayed on the browser tab:

2.e.How to setup & install HTTPS / SSL Certificate
What is SSL?
SSL stands for Secure Socket Layer. It is a protocol to secure the exchanges on a website. If your website or web application is secured by a SSL certificate, the exchanges on your website are secured and, for example, a user who signs up cannot have his password stolen by a hacker who tries to intercept the exchanges on your website.
If your website has SSL enabled that means you can access to it through a “https” connection. To try, just enter “https://your-domain.com” in your browser. If it shows a padlock symbol in the address bar, just before your domain name, that means your website has SSL enabled.
SSL can be enabled on your website or your web application by adding a SSL certificate on your hosting. In this article we are going to show you how to do that for your Siberian. Note that, if you are using a SAE you can add a SSL certificate your own way by using the SSL certificate options offered by your hosting provider. However if you have a Multi-Apps Edition or a Platform Edition, due to the fact you can have some clients using their own domain name for their apps or for their admin panel (in case of resellers for PE owners), we strongly advise you to use the process below.
Why you MUST use SSL?
From January 2017 the 1st, Chrome, which is one of the most used browser, will mark the sites that use authentication and/or credit card transactions with a “non-secured” flag in the address bar.
Here is what they say:
Beginning in January 2017 (Chrome 56), we’ll mark HTTP pages that collect passwords or credit cards as non-secure, as part of a long-term plan to mark all HTTP sites as non-secure.
In addition, Apple, and so it concerns the native applications, will reject and remove from sales any application that is not running under a HTTPS connection. That means you have to use RIGHT NOW a SSL certificate on your Siberian and publish an update of your application on the App Store.
SSL and Siberian
From Siberian 4.8.0 we have introduced Let’s Encrypt as our SSL Certificates provider.
Siberian will manage your certificates and their renewal automatically from the cron scheduler after the initial setup is done.
We also provide four API’s to push the generated certificates to the following common Admin panels, Plesk 12+, cPanel, VestaCP, and DirectAdmin.
Before starting this process, be sure to have your Siberian updated to the latest version.
Initial Setup
First go into Backoffice > Settings > Advanced > Configuration
You will likely see this section, for now your HTTPS is disabled, and you have no issued certificates from let’s encrypt.
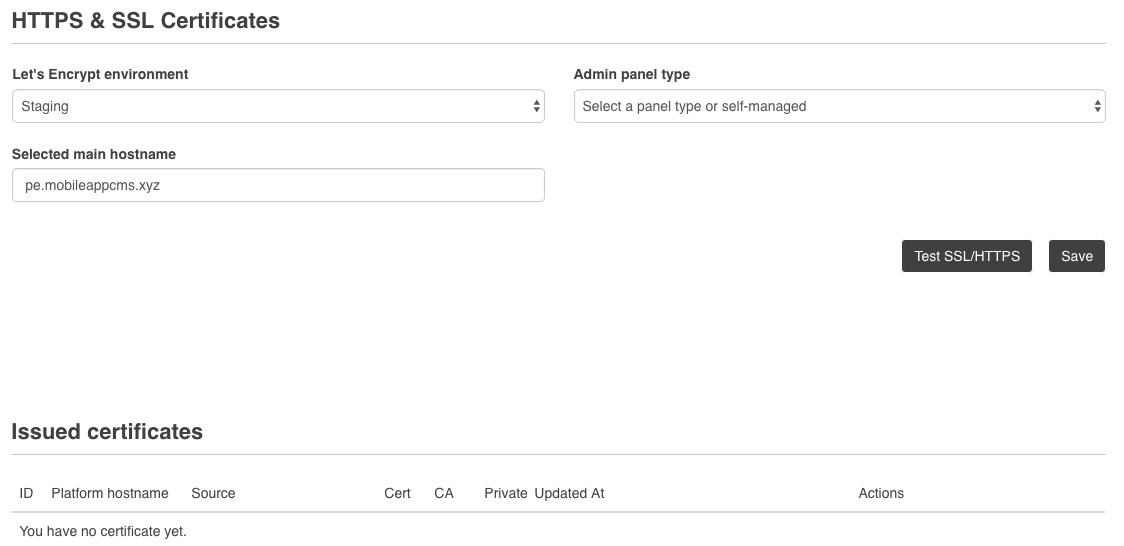
Let’s jump to the next step.
What do I need in order to setup & generate my SSL Certificates ?
You will see that Let’s Encrypt API is set on staging* (test) by default, set it to production.

- Get your admin* username, password & hostname
- Select your panel type in the list
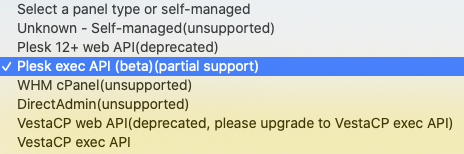
- Fill-in the required information
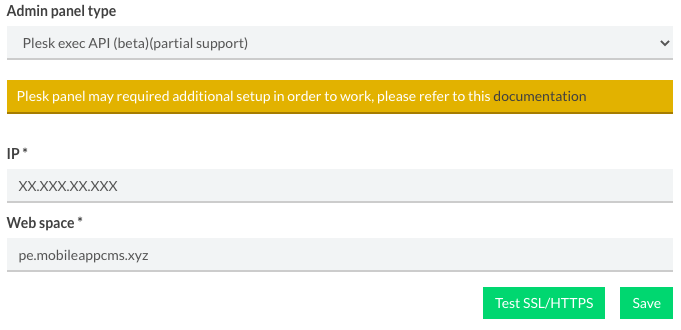
Host must be in the form:
- Plesk: https://mydomain.com:8443/
- cPanel: https://mydomain.com:2083/
- VestaCP: https://mydomain.com:8083/
- DirectAdmin: ssl://mydomain.com:2222/
Note: For VestaCP there are two options, VestaCP web API and VestaCP exec API.
For VestaCP exec API you have to enter only the username and web space (usually your Siberian domain name):
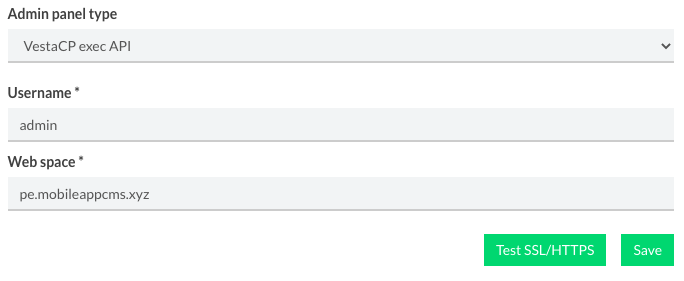
- If your webspace name created on your hosting panel, doesn’t match your domain name, then specify it in the field “Web space“. For example, you created a webspace called “siberian”, but your domain name is myapps.domain.com, then you will have to enter “siberian” in the field “Web space“.
- Then

- Wait for the page to reload, and click on

Note: Do NOT refresh or quit the page until it’s done.
- If the request is successful you should now see your certificate in the “Issued certificates” below

- It’s done ! Siberian pushed your certificate to your hosting panel and will check periodically with the cron scheduler if your certificates need to be renewed.
- For the Platform Edition, every-time a new White Label domain is setup, the certificate will be updated to match with the new domain.
*note: the admin account is generally required in order to use the API.
For cPanel users it happens sometimes that the certificate is renewed but not uploaded in the panel. You have to perform a manual action:
- download your renewed certificates by clicking on them:
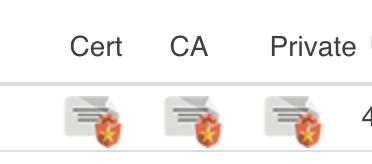
- Open them in a text editor (not Word, preferably)
- Then, enter in your cPanel
- Search for SSL and enter in this SSL section
- Click on “Manage SSL sites”
- Select your domain
- Copy and paste your certificates in the appropriate sections:
- The cert.pem in the “Certificate” field
- The privkey.pem in the “Private Key” field
- The fullchain.pem in the “Certificate Authority Bundle” field
- Click on “Install certificate” and you’re done.
- First select “Unknown – Self-managed”

- Then
- Wait for the page to reload, and click on
- If the request is successful you should now see your certificate in the “Issued certificates” below. Click on
 to check the paths:

- Setup your web-server with your new certificates, some examples below:
- Nginx: In your virtual host add the following lines
[...]
listen 443;

ssl on;
ssl_certificate /path/to/your/certificate/cert.pem;
ssl_certificate_key /path/to/your/certificate/private.pem;
[...]
Apache: In your virtual host add the following lines
[...]
<VirtualHost *:443>

SSLEngine on
SSLCertificateFile /path/to/your/certificate/cert.pem
SSLCertificateKeyFile /path/to/your/certificate/private.pem
SSLCertificateChainFile /path/to/your/certificate/chain.pem
[...]
- Nginx: In your virtual host add the following lines
- [Recommended] Next you will have to setup a root incron job , which will watch the certificate file “/path/to/your/certificate/cert.pem” changes to call your server to reload.
- For Debian, Ubuntu, etc…
- apt-get install incron
- For Fedora, Red Hat, CentOS, etc…
- yum install incron
- Setup your job “incrontab -u root -e” add the following line /path/to/your/certificate/cert.pem IN_MODIFY /usr/bin/reload-web-server.sh
- Example script for /usr/bin/reload-web-server.sh
-
#!/bin/bash
service httpd reload
-
- Don’t forget to chmod +x /usr/bin/reload-web-server.sh the script
- Example script for /usr/bin/reload-web-server.sh
- Start the service “service incrond start” or “/etc/init.d/incrond start”
- Now each time your certificate is renewed or modified (cf: new domains registered) your web-server will be reloaded to serve the new file.
- For Debian, Ubuntu, etc…
Thus it’s not a recommended way to setup your Siberian SSL, you can setup your existing certificates by giving Siberian their path or by uploading them.
- For the Platform Edition, every-time a new White Label domain is setup, you will have to renew your certificate by adding the new domains to the Subject Alternative Names of your certificate, otherwise your whitelabels won’t work with HTTPS.
- First you need to expand the upload section by clicking on the title or “+”
- You’ll then have access to this new form.
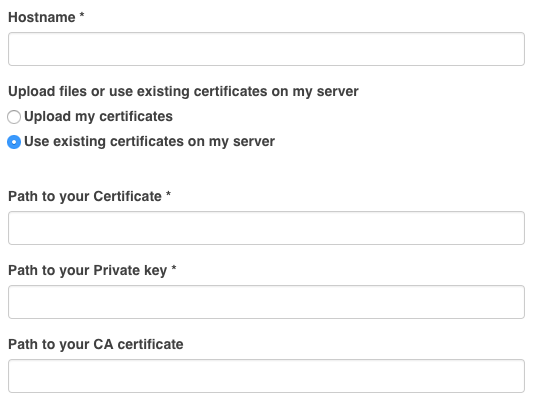
We highly recommend to provide existing paths to your certificates rather than uploading them manually, if you want to upload certificates jump to the next section #upload-my-certificates.You will have to fill in the main domain name in “hostname” and provide your certificates path.The certificates path must be the same already setup in your server virtual host, this way Siberian always have the latest certificate.
- Now click on upload and you’re done.
Upload my certificates
- Below you can see the upload form
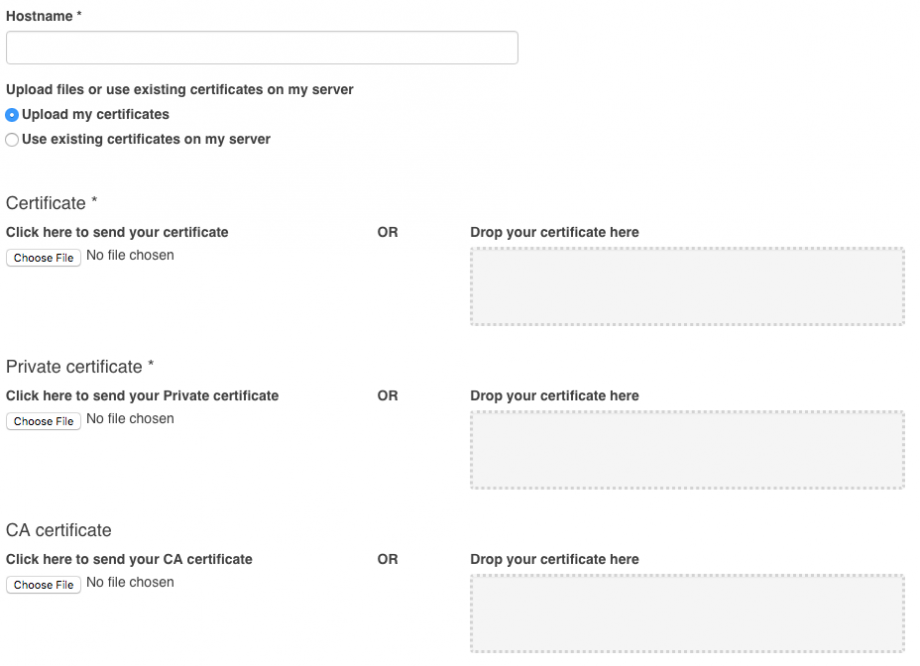
In this form you also have to fill in the main domain name in “hostname”, but this time you have to upload your existing certificates files.
- You can now click on upload and you’re done.
Note: when uploading certificates rather than giving Siberian the path, you will have to upload them again each time they are renewed
2.f.How to enable Push Notifications for Android with Firebase?
If you have the message “Firebase is not yet configured, please contact your Administrator”, please follow this documentation
Go on https://console.firebase.google.com
Login to your Firebase account.
- Create a new project
- Create a new Android App, with package name “package.placeholder” and app name “Platform Wide App”
- Note: it’s mandatory that you set the package name to package.placeholder otherwise the automatic configuration will not work.
- When done, You can download the file “google-services.json” then close the modal, the following steps are not required.
- Now open your project settings, then load the tab “Cloud Messaging” you’ll find your “Server Key” and “Sender ID”
- You can paste them in your Back-Office page “Settings > Push > Configuration” under the section “Firebase Cloud Messaging”
play_circle_outline Watch the Video steps
3.Set up your API Keys
Siberian uses several API services to get information, like google maps to show maps and direction for instance.
Once you have created them, you will have to add them in Siberian to allow Siberians to communicate with the service.
As always, if you have questions about some parts, feel free to send us an email to contact@siberiancms.com, our support team is ready to answer them.
3.a.How to create an API key for Yandex (to help you translate your CMS with ease)
Unfortunately, Yandex has stopped to deliver those api keys:

This documentation is now deprecated, only user already having an api key will be able to use the yandex API to translate in Siberian, until the dates indicated in the screenshot are reached.
- Go to https://tech.yandex.com/keys/get/?service=trnsl
- Click on “Register” if you haven’t yet an account. Otherwise click on “Login”.
- Fill in the form, with your mobile phone number. Click on send code and Yandex will send you a 4 digit code to your mobile phone. Enter the code from your phone to complete registration. Yandex will then give you an API key.
- Copy and paste the API key in the Backoffice of your Siberian in Settings > APIs:

- Then click on
3.b.Create a Google Maps Javascript API key
To create your Google Maps API keys:
Go to https://cloud.google.com/maps-platform/
Then click on ![]() on the upper right and follow the billing part.
on the upper right and follow the billing part.
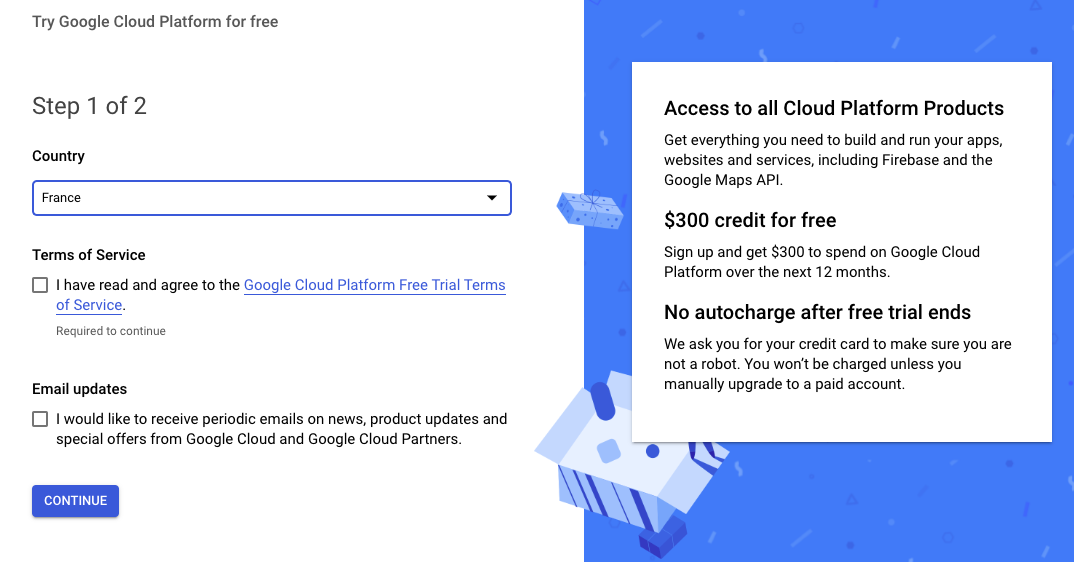
The account is automatically restreint to the free trial 300$ limit.
Once you have filled the billing form, hit the “Start my free trial” button.
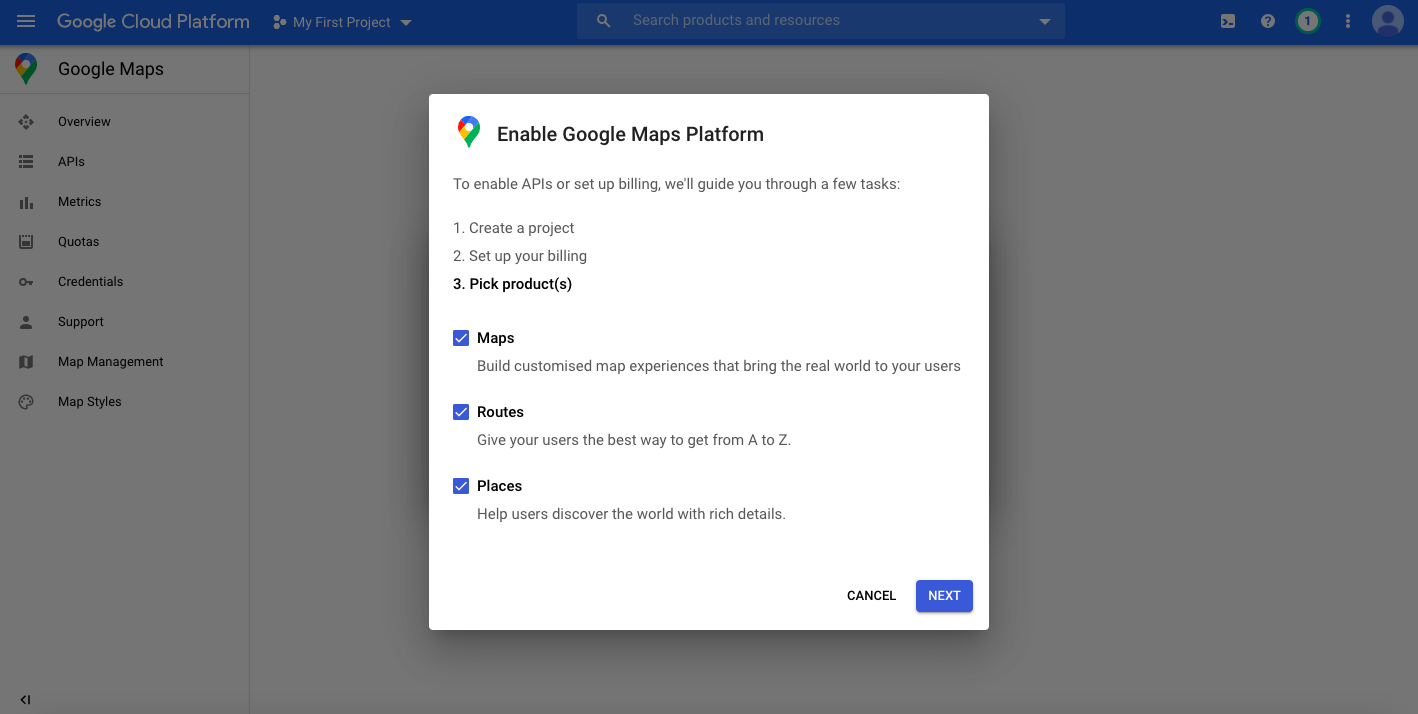
Once done, your first project will be created. Select the 3 options and click on Next:
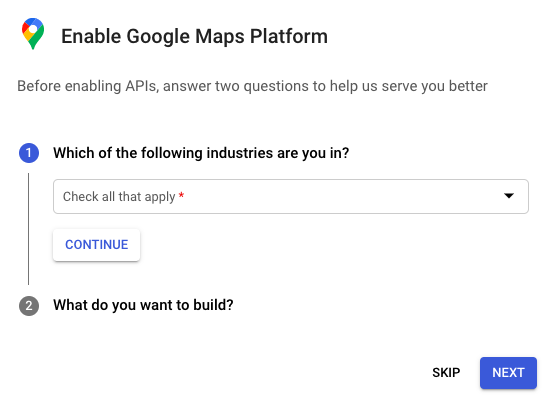
Answer the questions and click on Next:
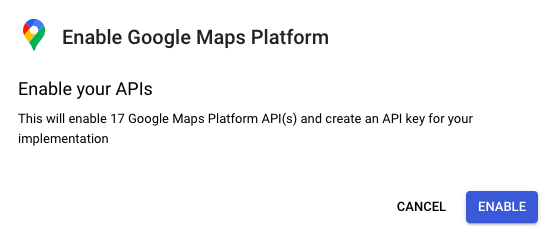
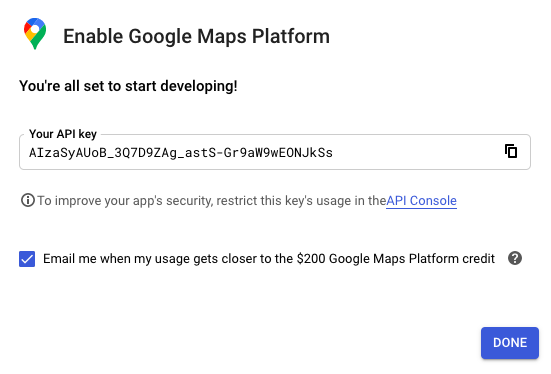
Enable your API key:
Copy your API key and click on API Console to set the restrictions:
In Key Restrictions > API restrictions, select “Restrict key” and select the following APIs:
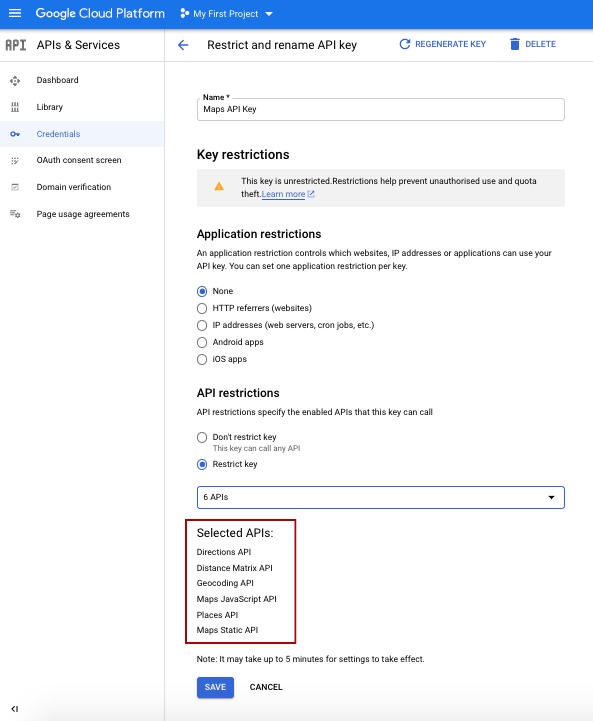
Save and you’re all set!
Now you just have to copy and paste your API key in your editor in Settings > API Keys:
(this one is used by the app):

and in your backoffice in Settings > APIs
(this one is used by the editor and backoffice functionalities):

3.c.Google API Key for Youtube
To create your API key for enabling Youtube videos in the Custom page and Videos features, follow these steps:
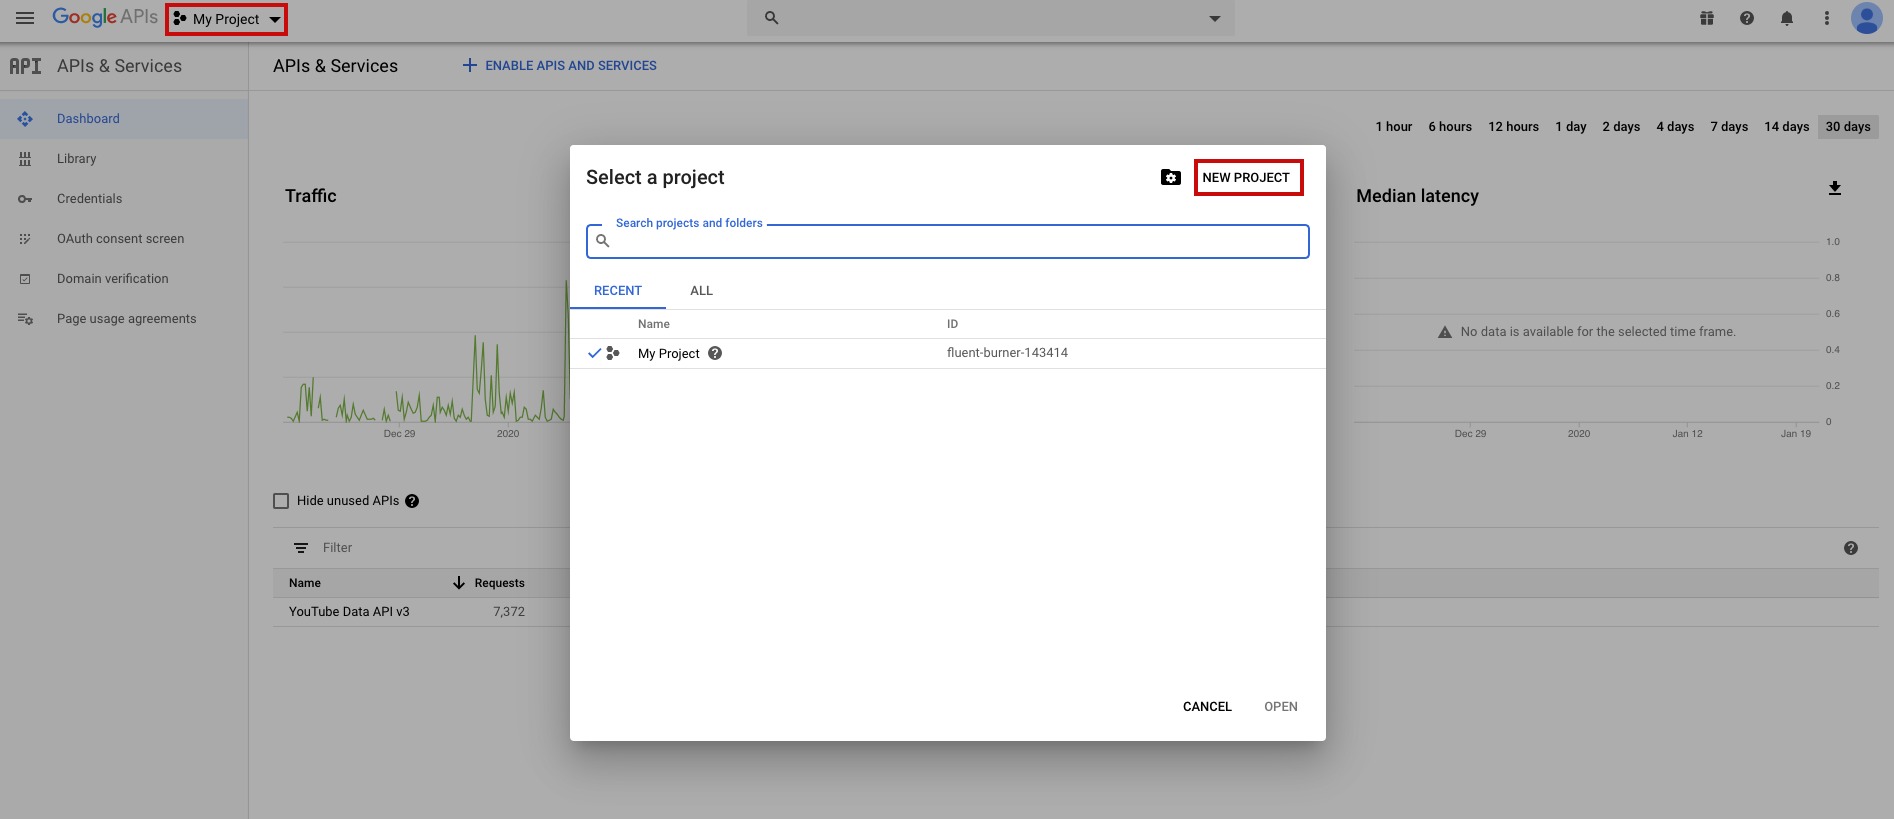
– Go on https://console.developers.google.com
– Login or create a Google account
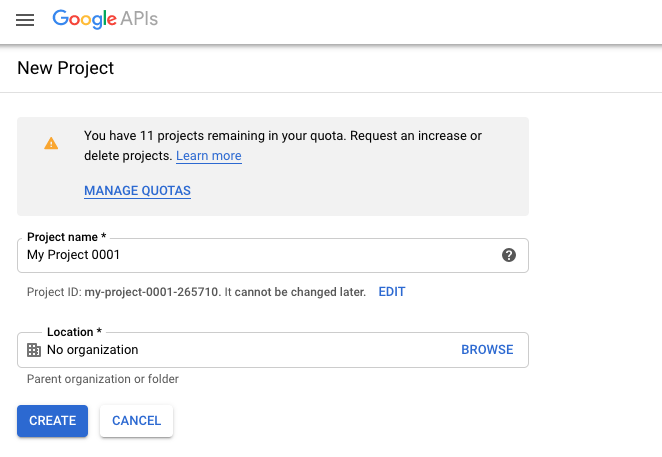
– Click on “Select a project” or “My Project” then click on “New Project“:
– Create your project:
– Select “Library” on the left menu and add “YouTube Data API v3“:

– Click on “Enable“:
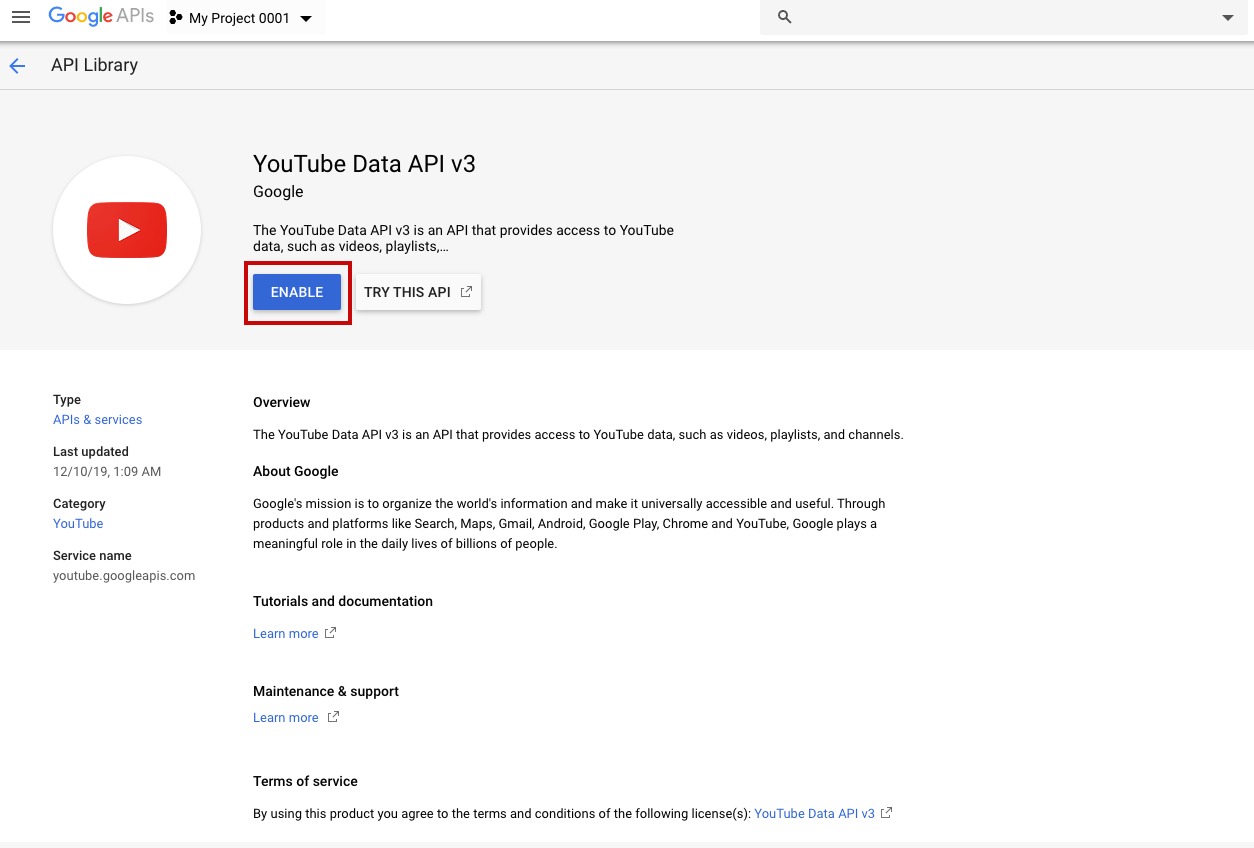
– Then click on “Credentials” on the left menu:
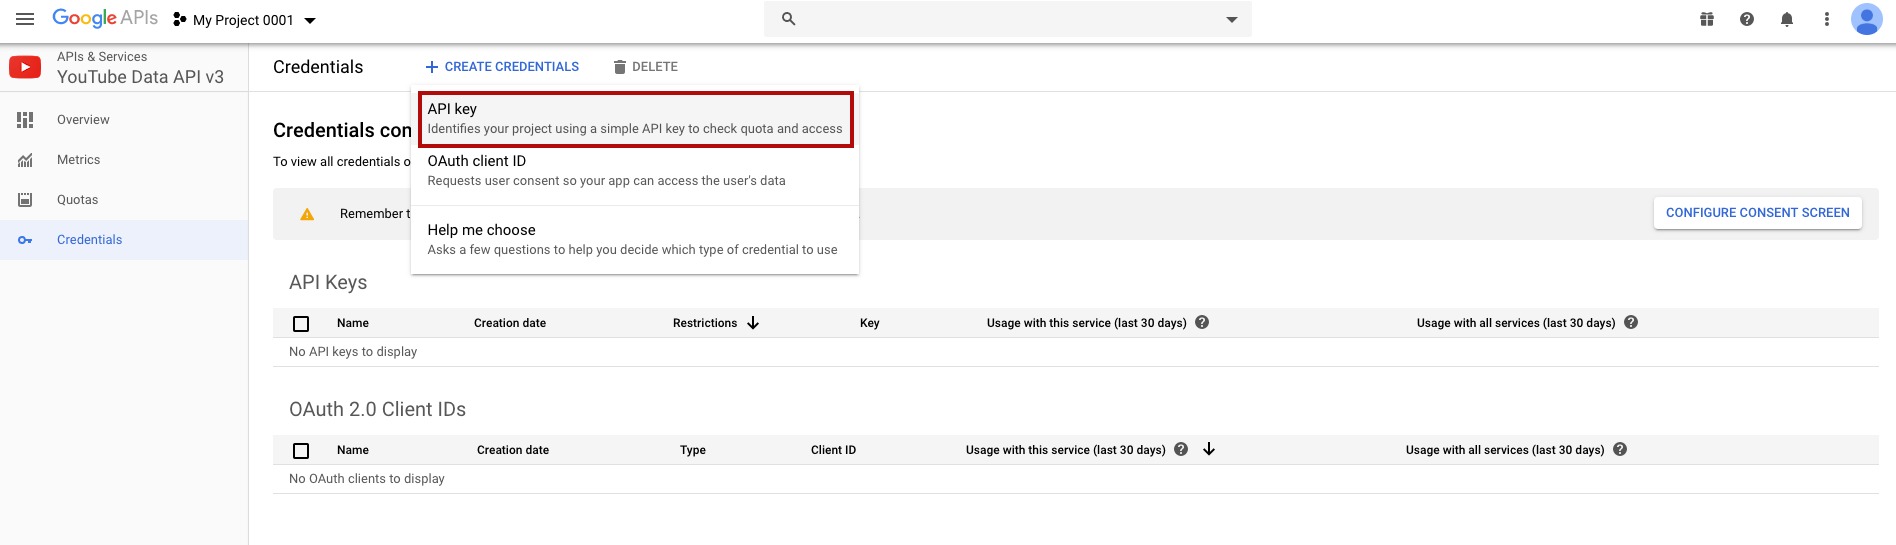
– Click on “+ Create credentials” > “API key“:
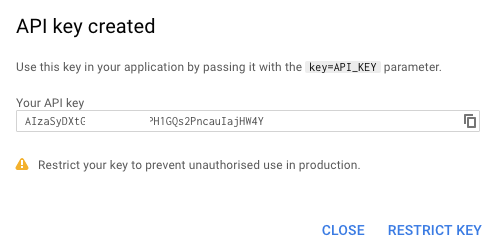
WARNING: Do not restrict the key, hit “CLOSE”.
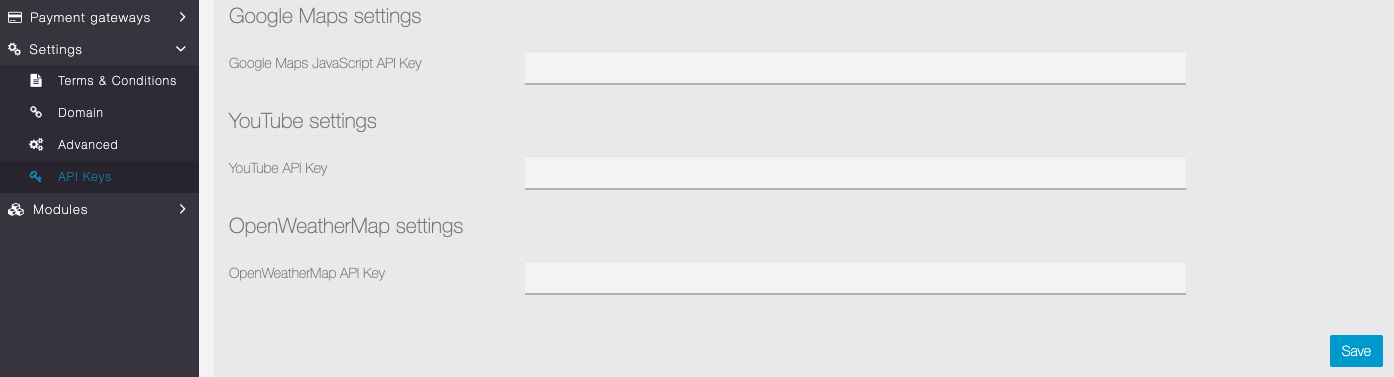
– Paste it in the appropriate field in the Editor in Settings > API keys >> Youtube settings:
3.d.How to create API keys for Facebook, Instagram, Flickr and Soundcloud
We are going to see how to create your API Keys for your Siberian.
1. You will need a Facebook user account
2. Go to https://developers.facebook.com/
3. Click on ![]()
4. Register and Verify your account
5. Enter a name for your Facebook app (you may choose a name that refers to your platform, like “Apps Maker Company”). This name will be displayed to the app users when they would want to create an account in the mobile app through Facebook connect.
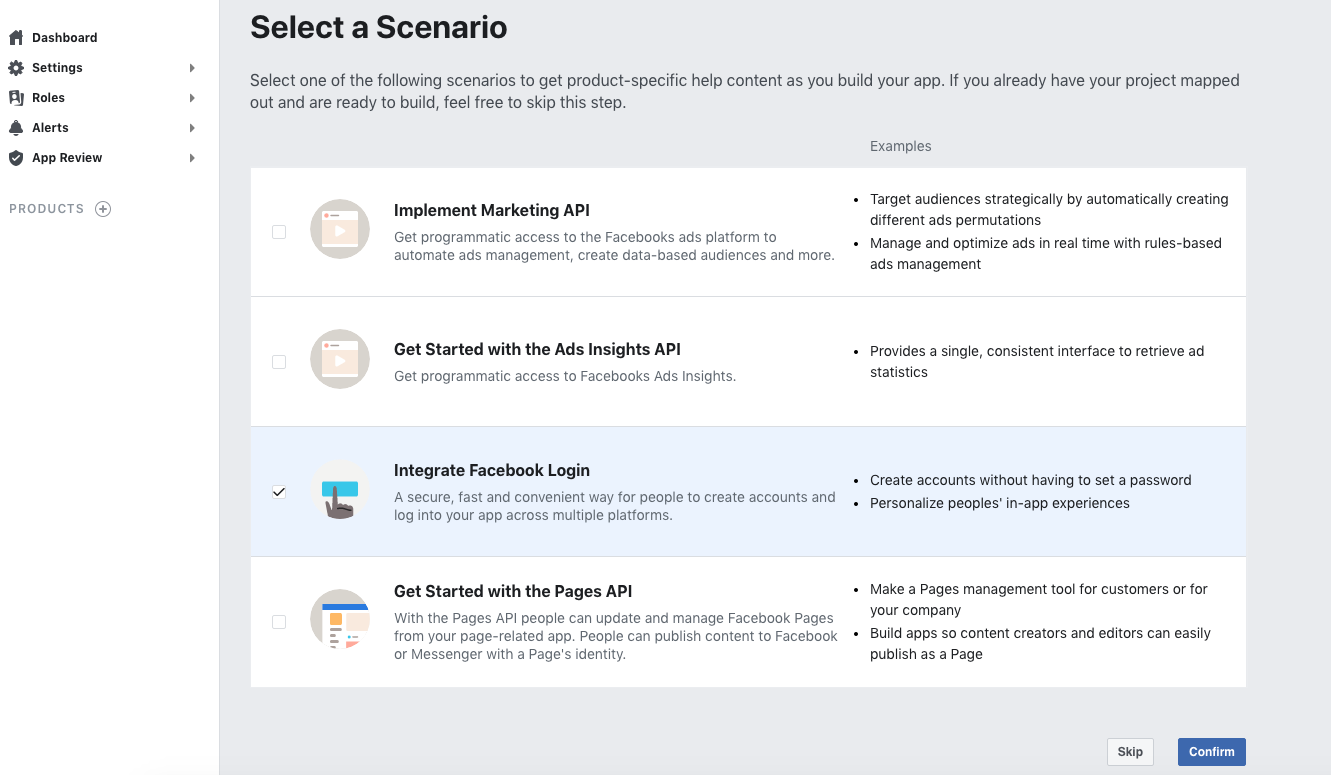
6. On the page “Select a Scenario“, select “Integrate Facebook Login“
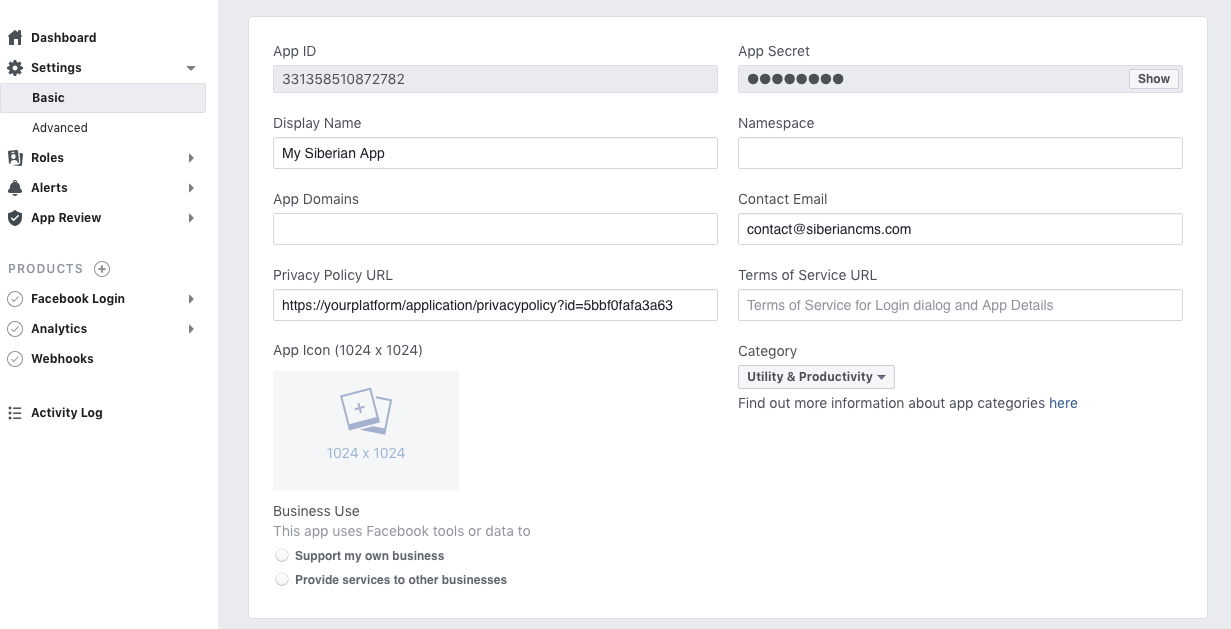
7. Go to Settings > Basic in the left menu.
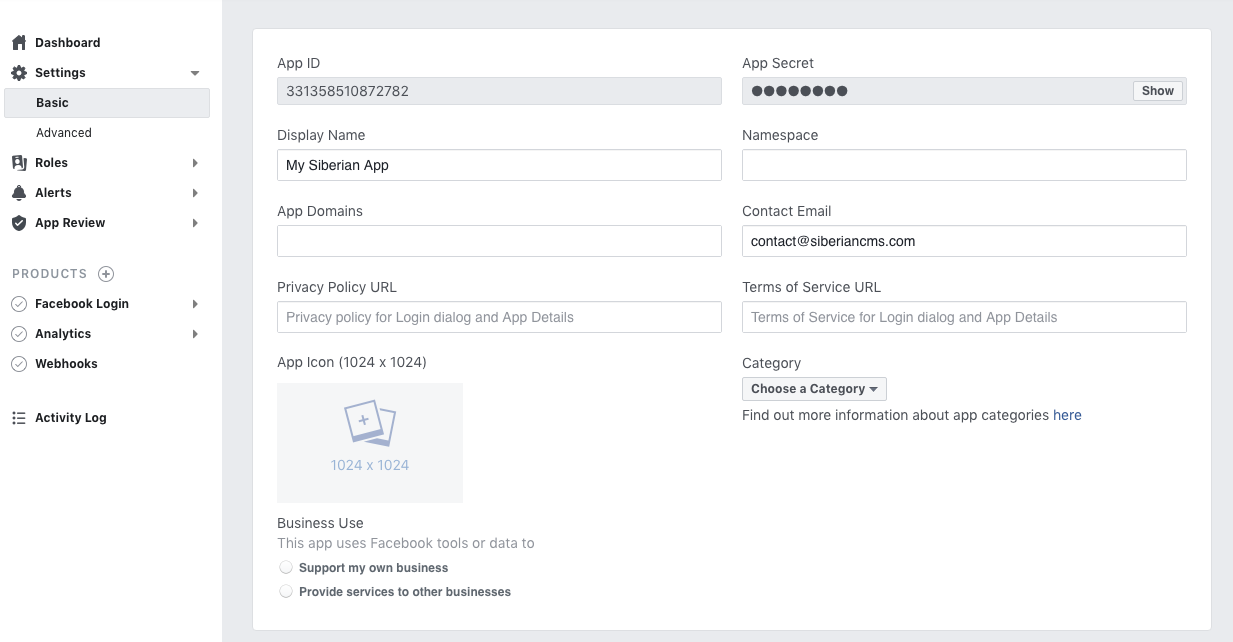
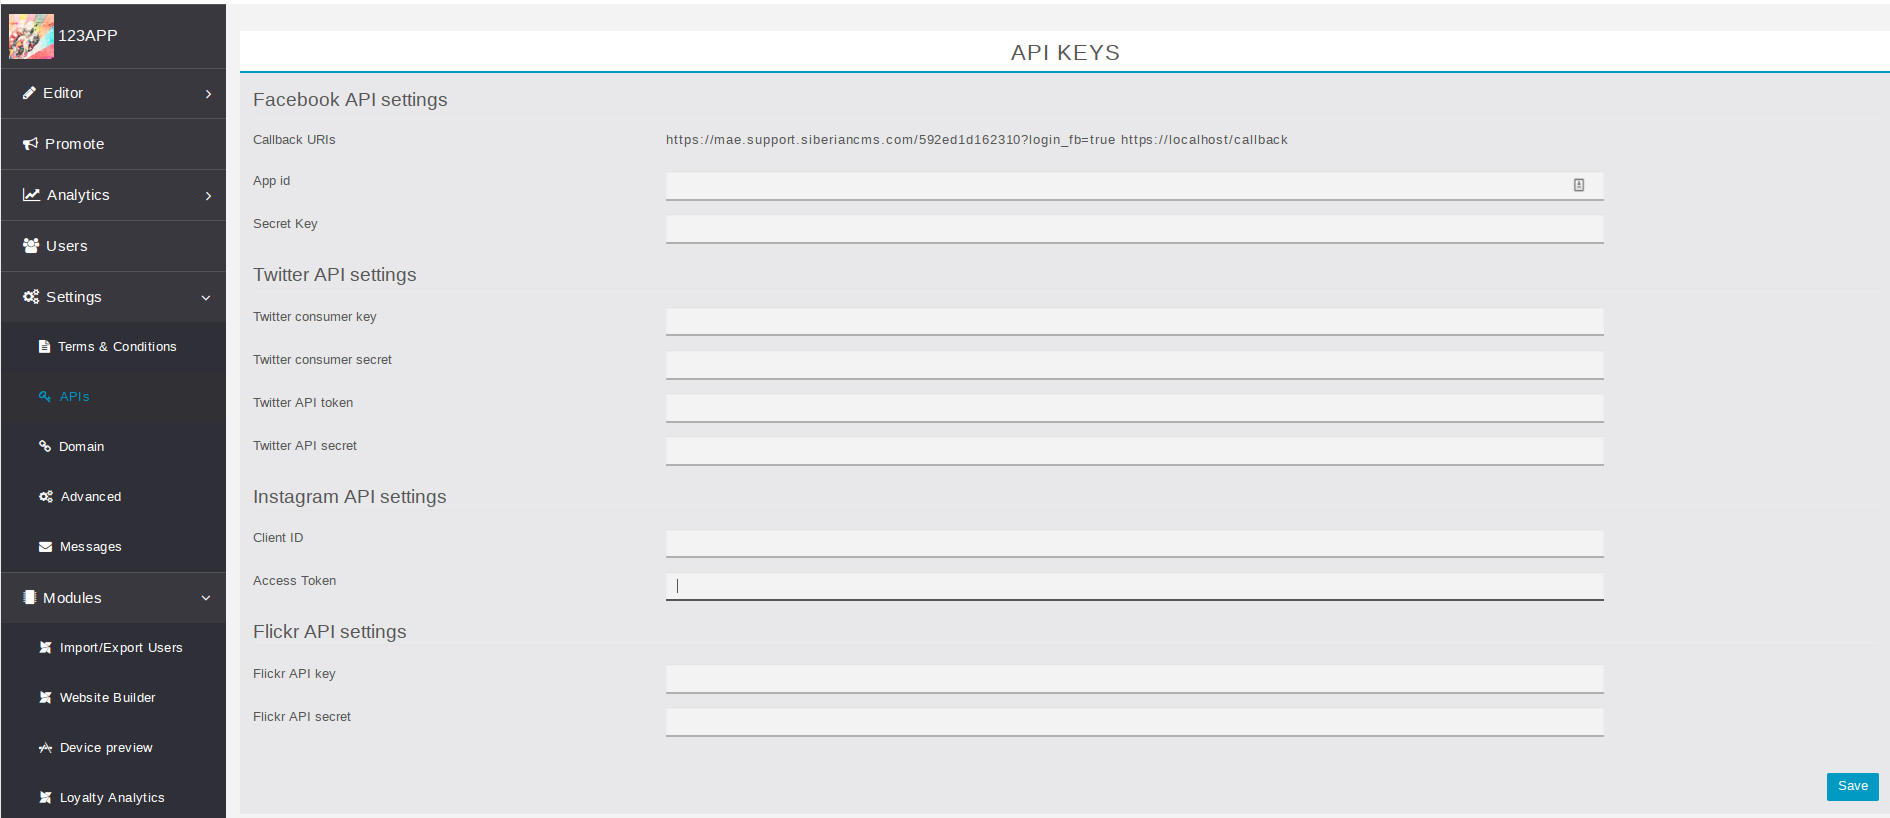
Here are the App ID and the Secret you will use in Siberian. There are two ways to use the Facebook API key in Siberian:
- In the Backoffice > Setting > APIs
This one will be used in all your Apps. The advantage is that you won’t have to create an API key per app. The disadvantage is in the case of the use of the Facebook login in the app: the users will see the name of the Facebook app that you use for your entire Siberian. So, especially for Platform Edition owners, that means the clients of your potential resellers will see the name of your Facebook page. Our advice is to choose a generic name so that you won’t be annoyed by your resellers. - In the app Editor > Settings > APIs
This one will be specific to the app. The advantage is that you can choose a name for your Facebook app that matches the name of your app, with the same icon. This way, when an app user uses the Facebook login, Facebook will display an app asking for users consent that has the same name as the app. The disadvantage is that you have to create an API key per app.
Note that you can add a specific Facebook API key for an app even if you have a Facebook API key in your backoffice, the one you have set for one app in the editor will take over the one from your backoffice.
Depending on your choice, copy and paste your “App ID” and “App secret” in your Siberian Backoffice in Settings > APIs or in your Editor in Settings > APIs.
8. In the case you create a Facebook key for one app, in your Siberian Editor, go to Settings > APIs and copy the Callback URLs (if you create a Facebook key for your backoffice, you don’t have to bother with this URIs. So, go to step 9) :
9. From the Facebook settings left menu, click on “Facebook Login” > “Settings” and paste the Urls then click on “Save changes” (in the case of a key for your backoffice, just enter https://localhost/callback):
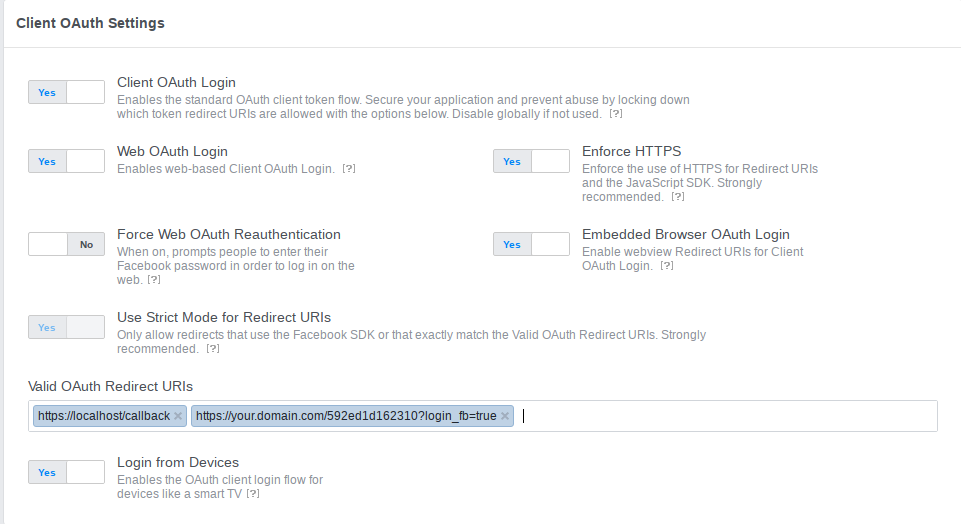
- https://localhost/callback is used on phone and tablets. So the API key from backoffice > settings > API will work for all your apps on a phone or a tablet.
- https://your.domain.com/592ed1d162310?login_fb=true is specific to the html5 website of your app.
So, if you want to have the Facebook login in your apps’ html5 website, you will have to create a new Facebook API and add it to the editor API settings.
10. Go back to Settings > Basic menu. In the App Domains field, left it blank. For Category, select “Utility & Productivity“.
11. Add a Privacy Policy URL.
12. Click on “+Add Platform” and choose “Website“:
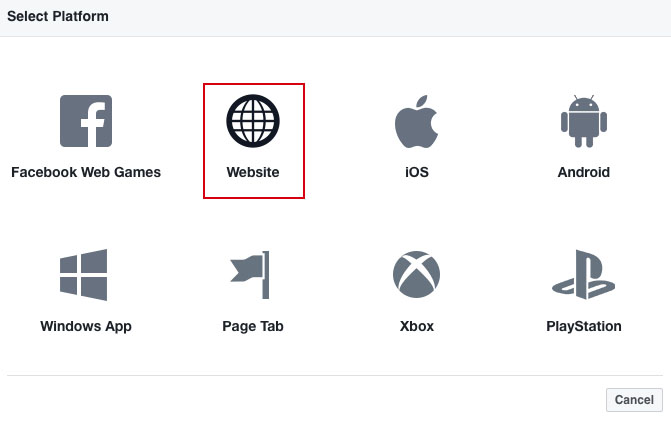
13. In the Site URL field enter the address of your platform (aka your Siberian) and this time with “http://”, and “www.” if your platform is on your main domain. If it’s on a subdomain, enter your subdomain like http://apps.mydomain.com. Enter also the URL to your domain name, and http://*.yourdomain.com (if your Siberian is at siberian.domain.com enter http://*.domain.com”. Then save.
(We recommend you to set both “http” and “https” address, and so 6 entries)

Example for http://app.siberiancms.com: http://app.siberiancms.com, http://siberiancms.com, http://*.siberiancms.com, https://app.siberiancms.com, https://siberiancms.com, https://*.siberiancms.com,
14. You can also add an app icon for your app. It’s not mandatory but your Facebook app will be more professional with an icon when the user will be invited to connect with his Facebook account. Click on “Save Changes“.
15. From the top menu, click on ![]()

16. Click on Confirm.
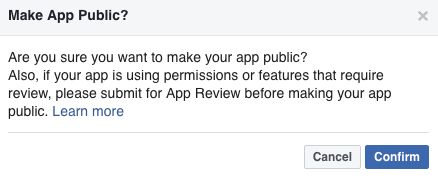

17. You’re done!
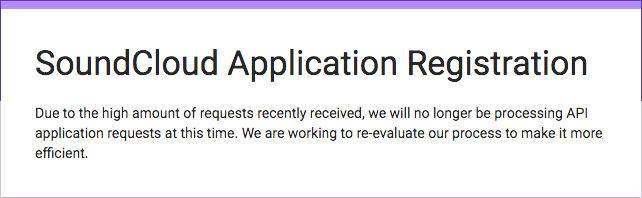
Unfortunately, Soundcloud doesn’t deliver new API keys anymore. We will update the documentation when their API system is fixed.
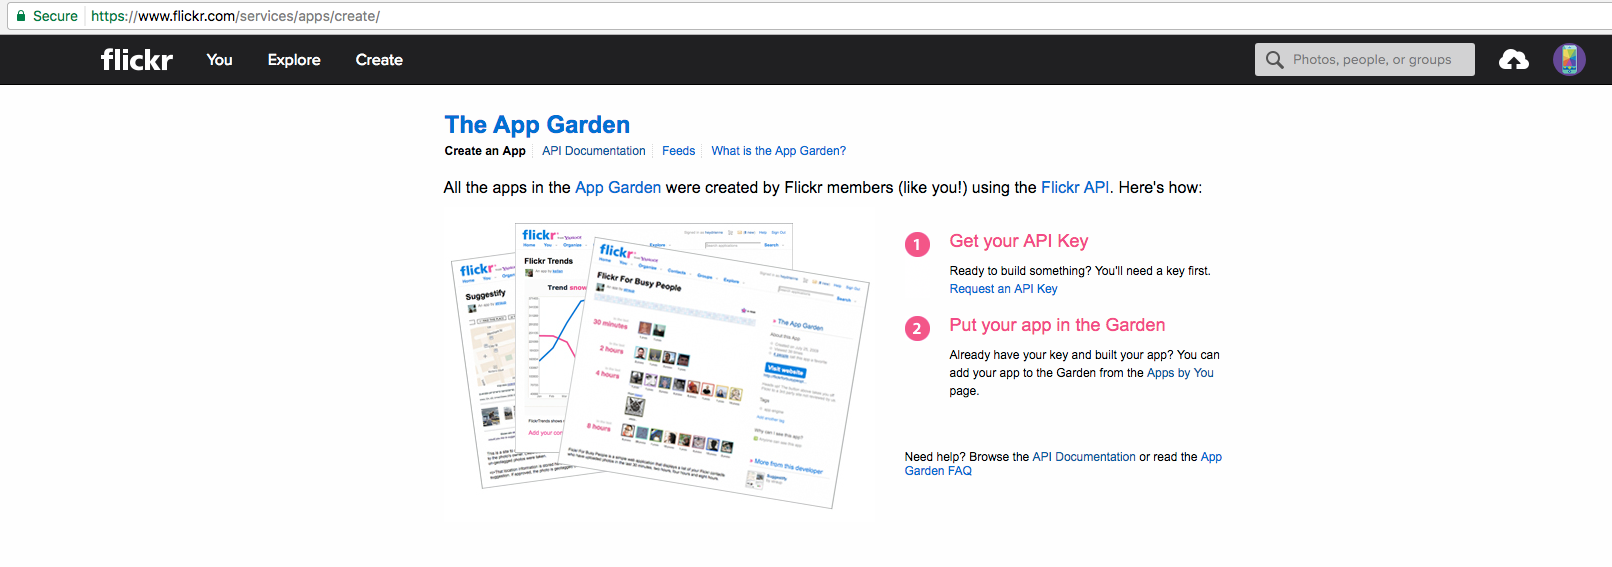
Go to https://www.flickr.com/services/apps/create (you must have a Yahoo account).
Click on Request an API KEY.
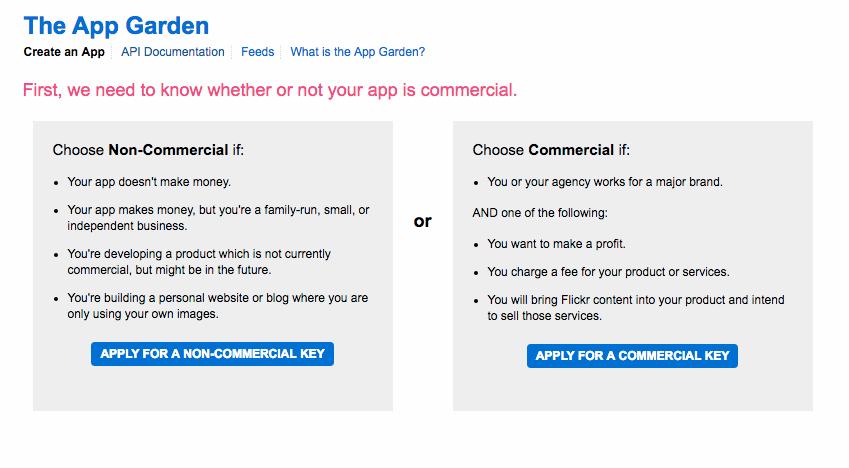
Click on Apply for a non-commercial key.
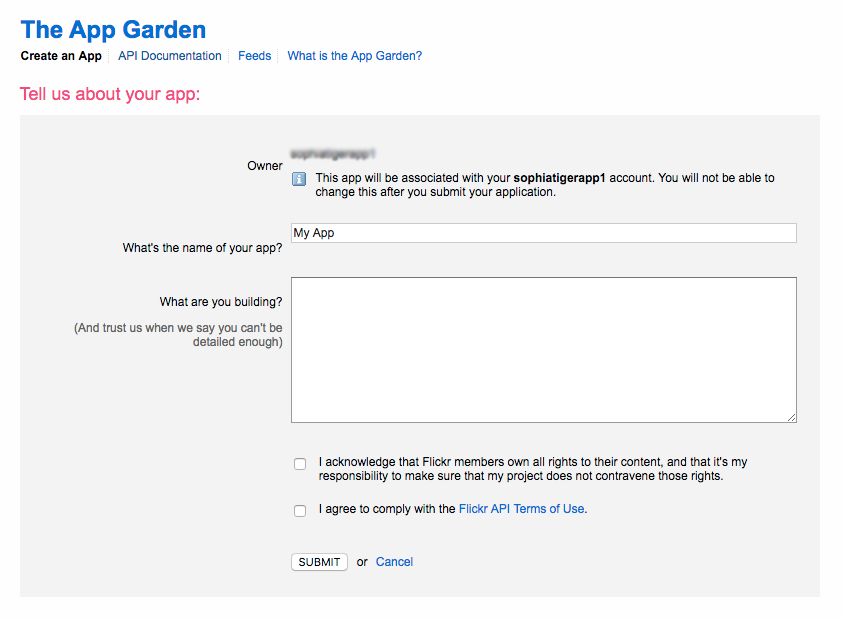
Then enter the name of your app and a description and click on Submit.
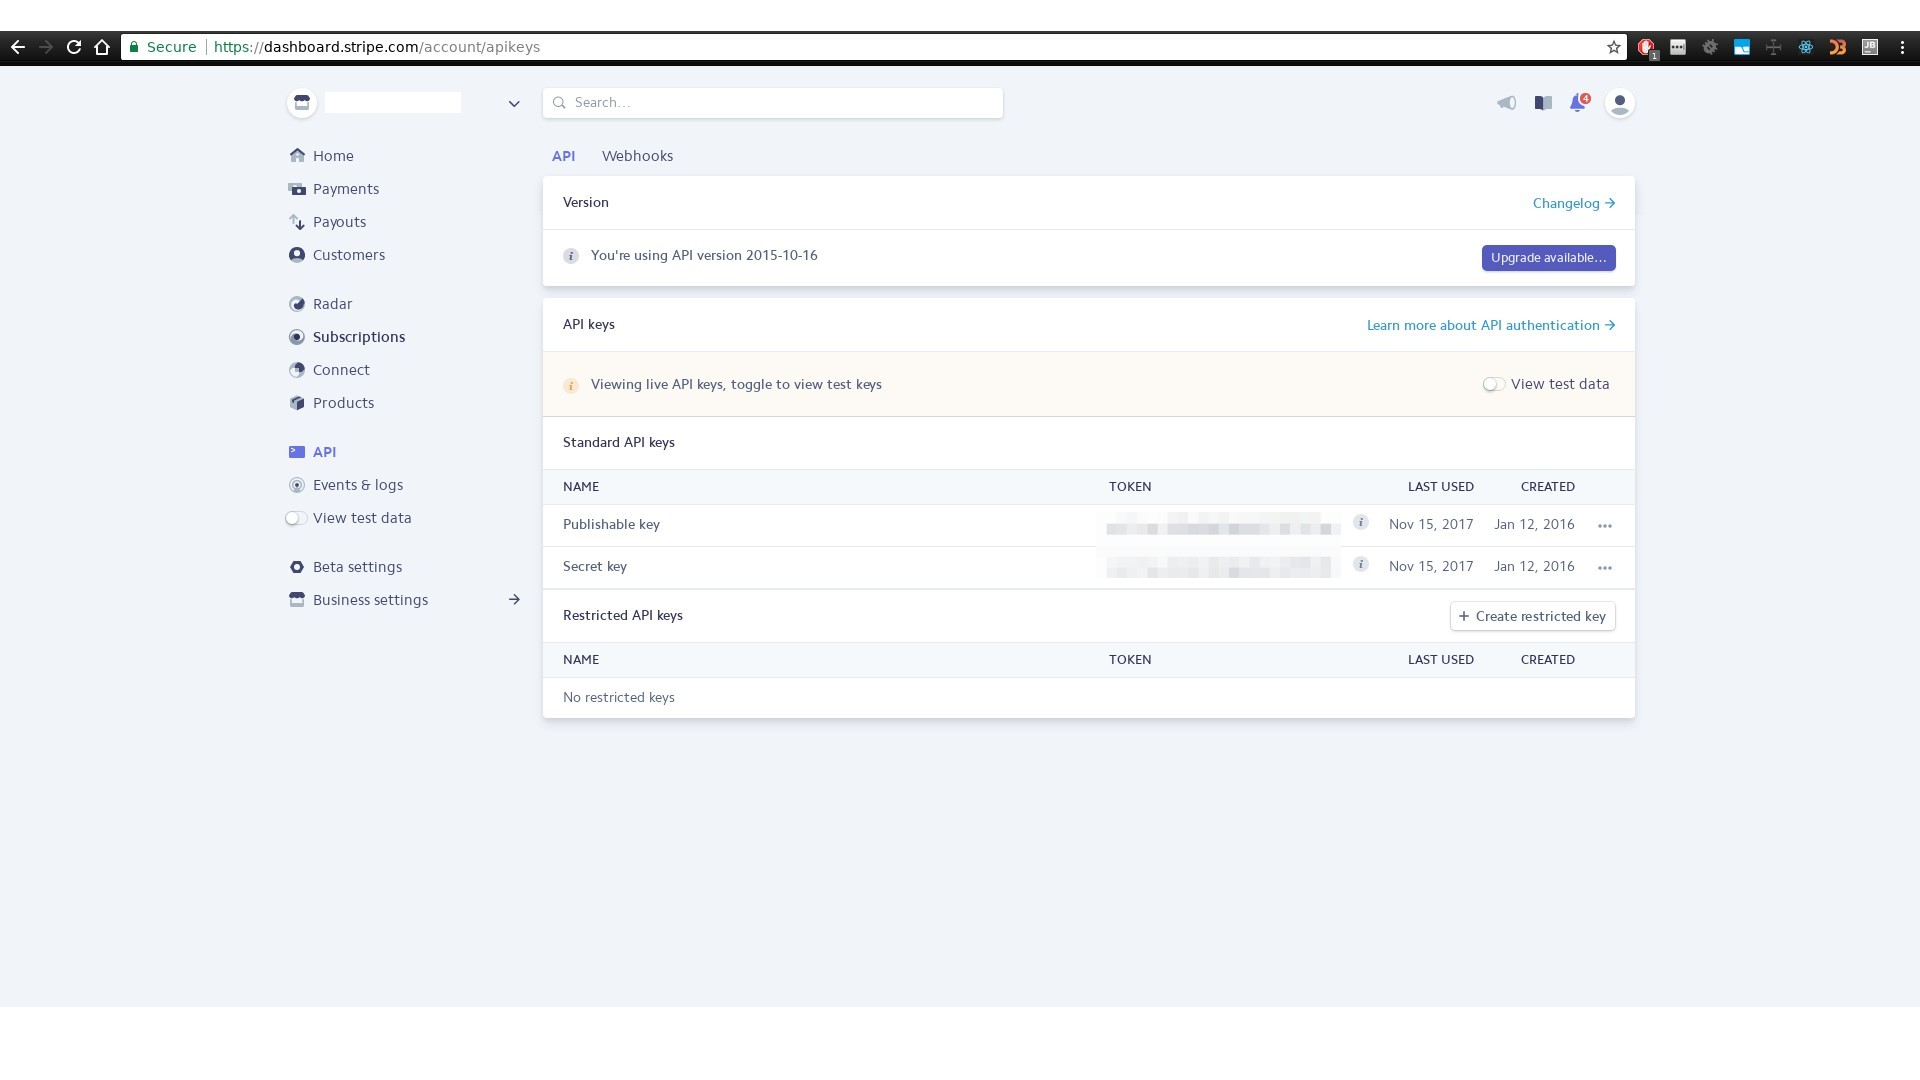
3.e.How to create an API key for Stripe (Platform Edition & Mcommerce)
3.f.How to create an API key for 2checkout (Platform Edition & Mcommerce)
- In your 2checkout account, click on the gear at the top right of the screen, and click on User management:

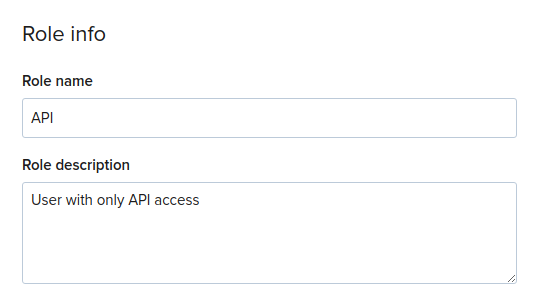
- Then, click on “Roles” tab and “+ Add role” to create a new role:

- Give that role a name and a description:
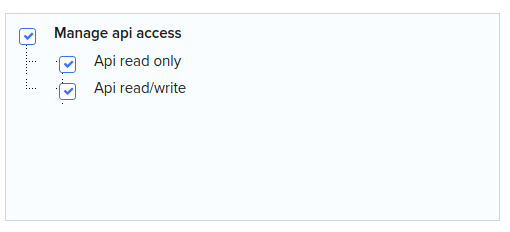
- Then, in the “Privileges” section, untick everything except “Manage api access”:
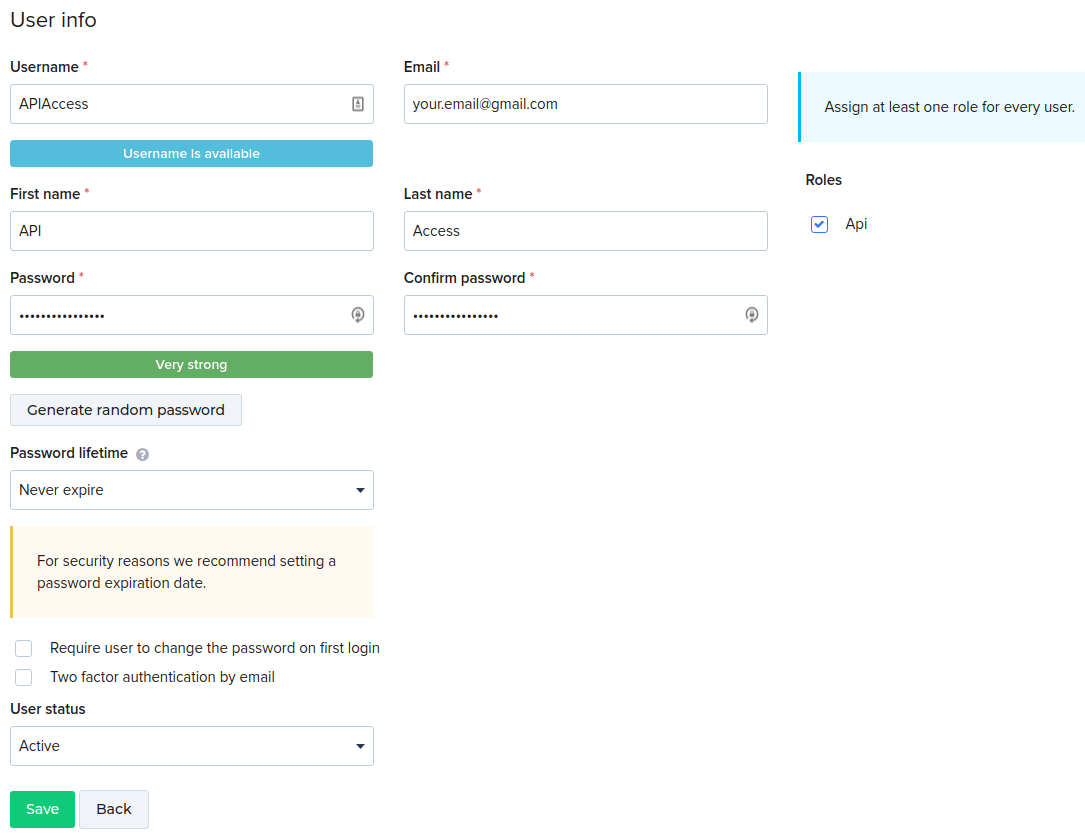
- Click on “Save” at the bottom to create the role. You can now click on the “Users” tab, then “+ Add user” button:

- Create the user, set the “Password lifetime” to “Never expire”, untick the “Require user to change the password on first login” option, then select the Role created just before:
- Click on “Save” to create that account
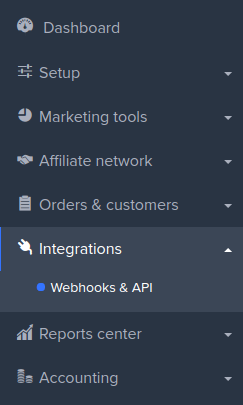
- You can now setup the API key, for that click on “Webhooks & API” in the “Integrations” section of the left menu:
- Copy and save the “Merchant Code” and the “Secret Key“
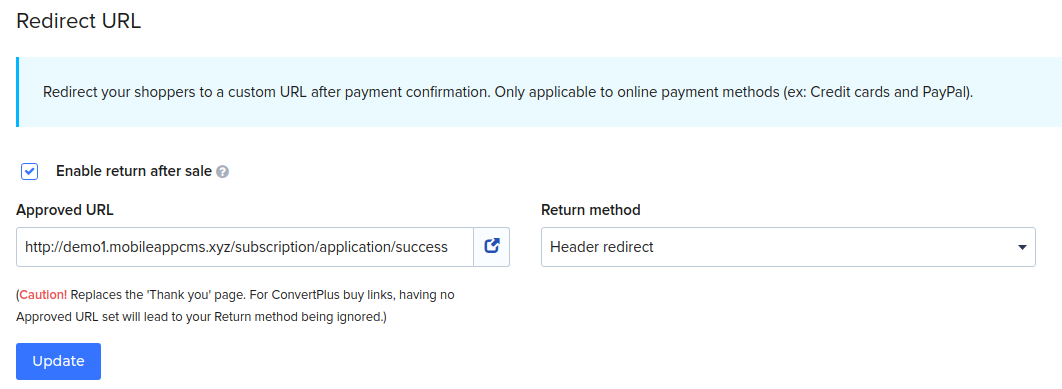
- In “Redirect URL”, check the “Enable return after sale” option. Enter “the-url-of-your-platform/subscription/application/success” in the field “Approved URL”, and select the “Header redirect” return method:
- Click on “Update” to save your changes. Now you can head to your Platform Backoffice > Settings > APIs:

- “sid” = Your Merchant Code
- “secret” = Your Secret Key
- “username” = The Username of your API user
- “password” = The password of your API user
That’s it, click on “Save“, and you are good to go !
3.g.How to create an API key for Paypal (Platform Edition & Mcommerce)
Used only with the Platform Edition or, by your clients, in the Mcommerce feature.
Important : your Siberian must use a currency supported by paypal. You can find the list here. You can check your current currency in settings > general of your backoffice.
- Paypal API username
- Paypal API password
- Paypal signature
Under your name make sure your status reads: Verified. If your account isn’t verified you have to verify it by Paypal.
- Then, from the Paypal menu, go to profile:

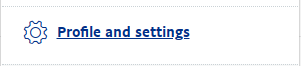
- and select profile and settings:
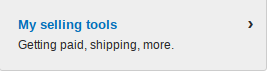
- From the next page, select “my settings tools:
- Then, find the “api access” line and click update:

- On the next screen, choose “Manage API credentials”:

- Then select “request API signature and hit “agree and submit”:
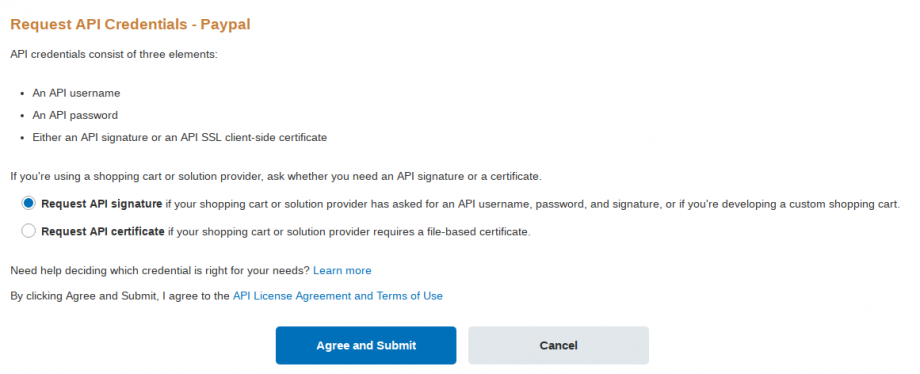
- Greatings, you have created your API crendentials, click show and paste them:
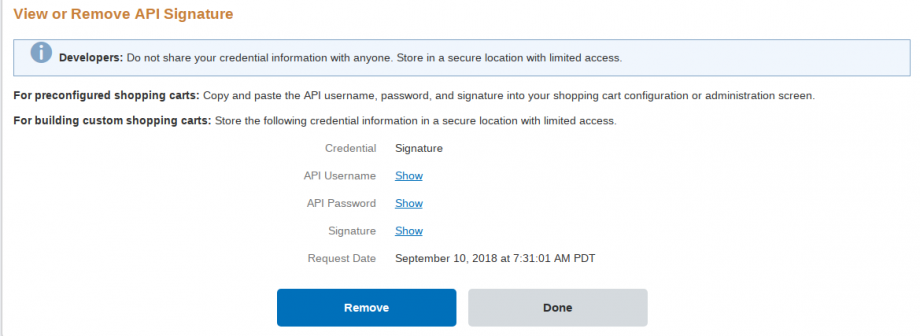
- Then go in your Siberian Backend, Settings > APIs, and fill out the Paypal fields with your info:
Your Edition is now ready to receive payments with Paypal.
4.Set up your pricing plans and taxes (Platform Edition)
In Siberian Platform Edition you can create subscriptions plans, in which you can set several options, like the number of apps, the features available and of course the paiement model.
The taxes applied to the prices can also be managed from the backoffice. You will be able to set taxes according to your customer’s country, and even state.
We will see in this documentation how to manage your plans, your subscriptions and also your taxes.
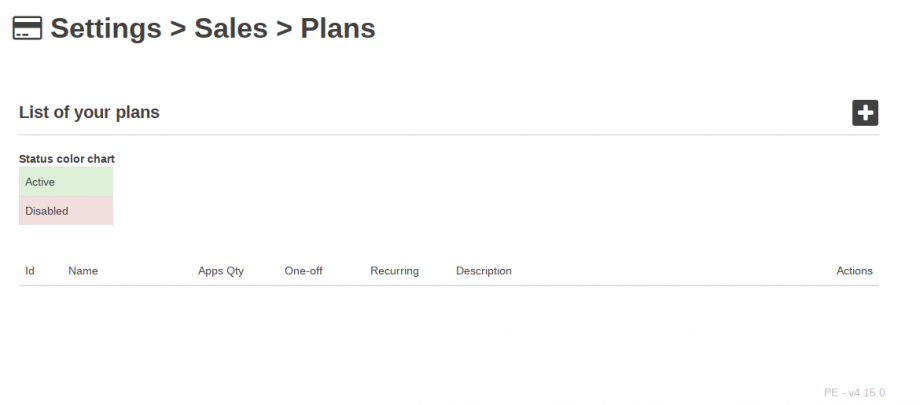
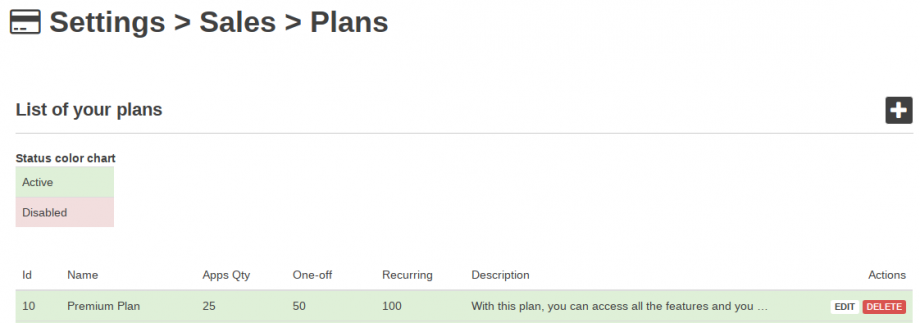
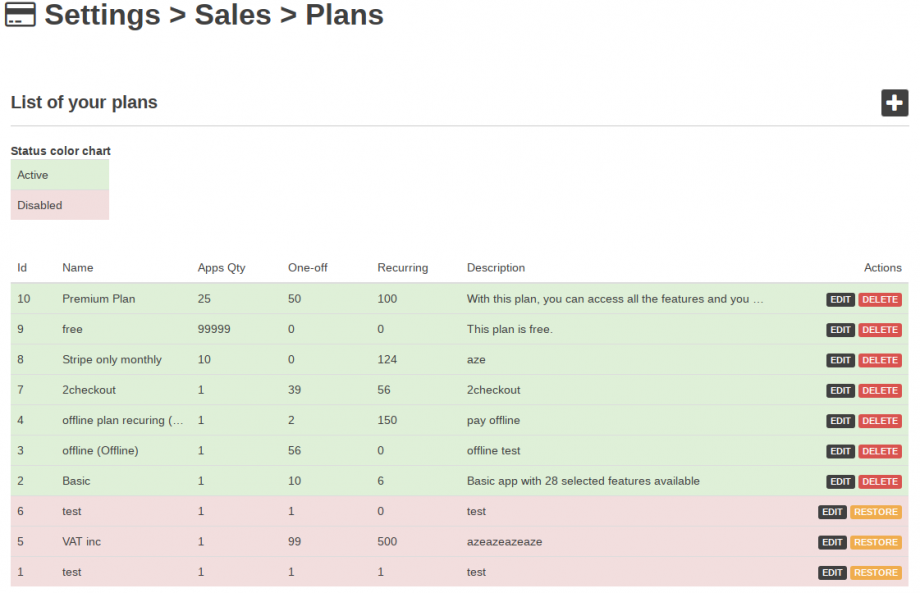
![]() from your plans list:
from your plans list:
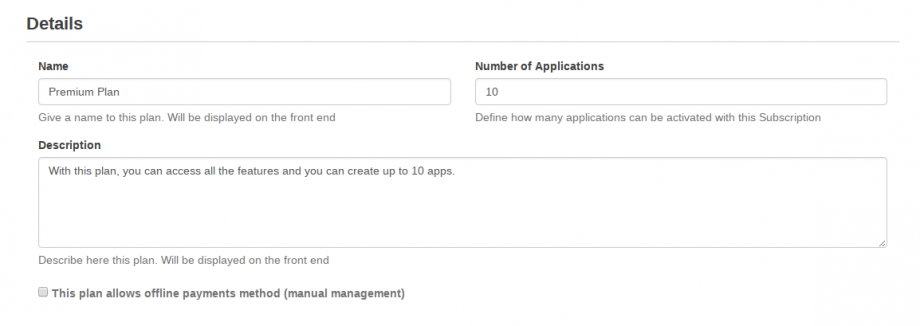
- Number of applications: from 1 to 100000. Your customer will be able to publish the number of app(s) you choose using this plan.
- Offline option: an offline plan allows your customer to pay “offline”, with a check for instance. The subscription is not active until you active it manually after receiving the payment.
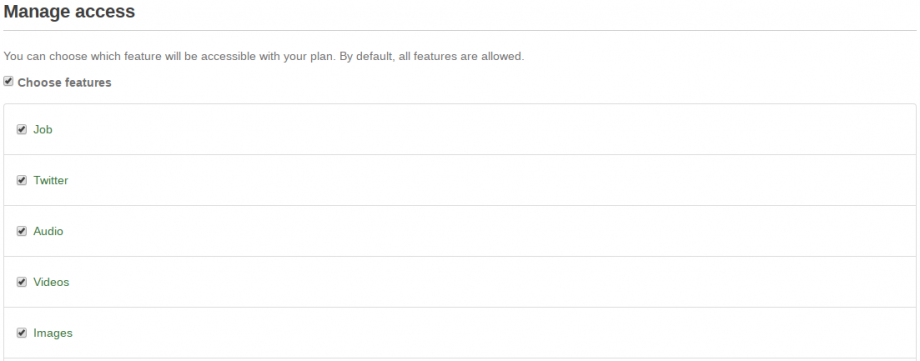
This is pretty straightforward, selected features will be available in editor while not selected ones won’t be.
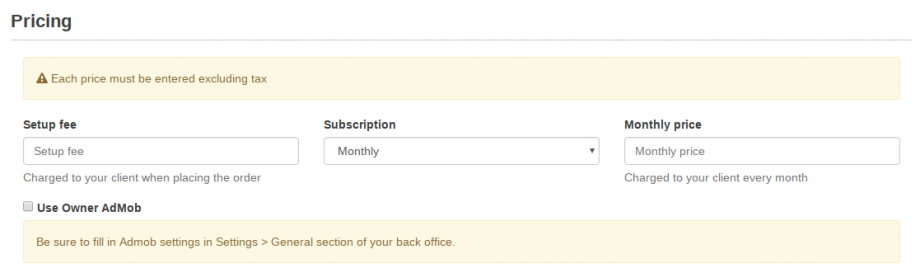
- Setup fee: This amount will be paid only once.
- Subscription: Set the recurring period: monthly or yearly
- Monthly Price: The amount your customer will pay at each recurring period
- User owner admob: If activated, all your customer’s apps linked to this plan will use your own admob account to display adds in app.
![]()
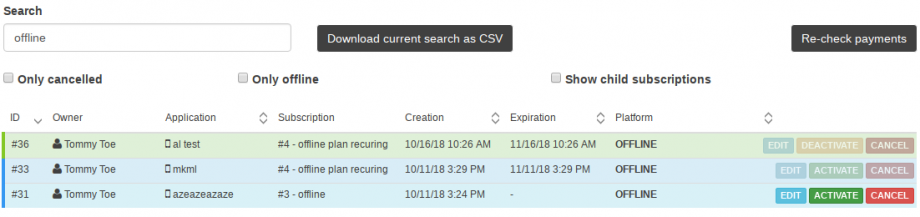
If you need to cancel all subscriptions for a plan, it can be done manually from Backoffice > Sales > Subscriptions.
‣ If you have the Stripe module, it’s version should be > 4.15.
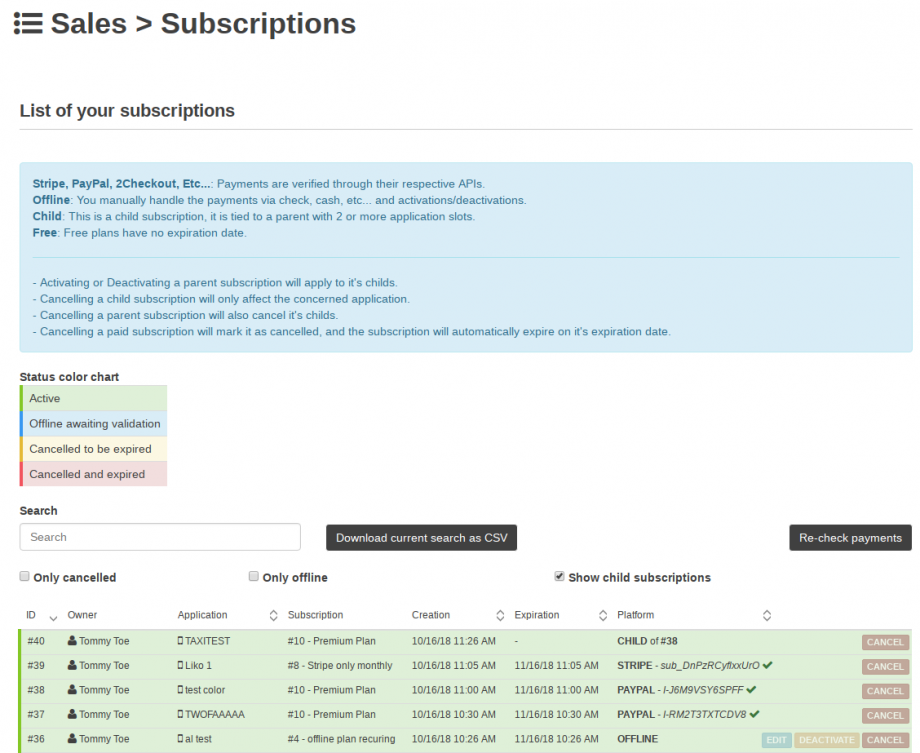
| Active | The subscription is active |
| Offline awaiting validation | Those offline subscriptions are not active, you have to activate them manually |
| Cancelled to be expired | Those one are already canceled, but the plan is still active. It will be deactivated on the ending date |
| Cancelled and expired | This one is not active and expired |
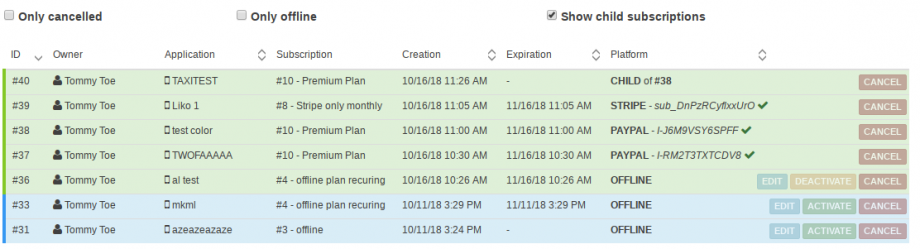
- Here you can see the subscription #40, which is a child of subscription #38. The parent subscription is the first app linked to a plan. Those added afterwards are childs of this one.
For each one, you can trigger those actions:
-
- deactivate will stop the subscription. For offline apps, the effect is immediate while for other subscription types it takes effect at the end of the recurring period.
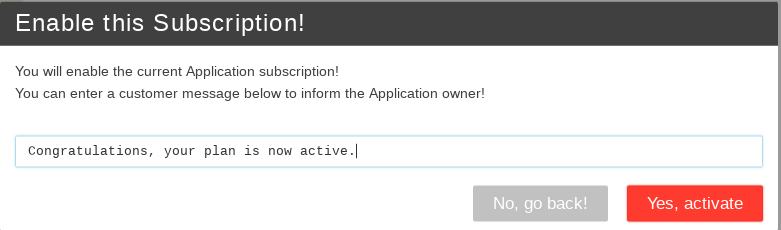
- activate will activate the plan. As the period starts at the plan’s creation, you may have to edit the expiration date with the editbutton.
- cancel will stop the subscription at the end of the current period, except for offline subscriptions (they are cancelled instantly).
- Those action will send a message of your choice by email to your customer:
![]() from your taxes list:
from your taxes list:

-
- Select the country and region : customers who have an adresses in this country and region will have this tax applied.
- Use The + to add more region for a country:

- You can delete a region or a country by hitting the x
5.Resources
If you have questions, there are different resources to get some answers from, such as:
- doc.siberiancms.com – our documentation website
- contact@siberiancms.com – our main channel for questions
- www.siberiancms.com/community/ – our forums, where you can share with other Siberian owners.
- www.youtube.com/channel/UCViV4hyFWYJKtUhEP7DVw8w – our Editor Video documentation (it is white labelled and can be shared to your users)
- www.facebook.com/groups/617340045067269/ – The main Siberian developer group (note: this group has been created by users and does not belong to us)